Category: guide

  • Infrared Photography Part II: Processing

    Infrared Photography Part II: Processing

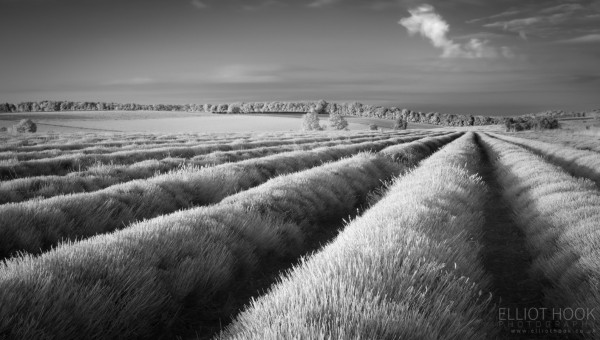
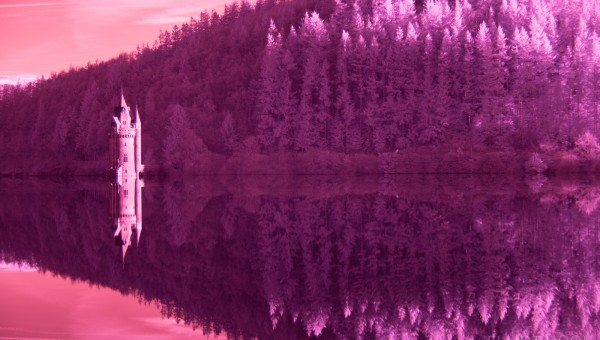
    Late last year, I wrote my first post on infrared photography that attempted to cover the practical aspects of using a Hoya R72 IR filter to capture IR images.  This post is a follow up, and is more focussed on the processing side of things using Lightroom.  I’m not sharing anything new or novel here really, it’s more an exercise to highlight resources that are already out there that helped me find my way.

    IR photography lends itself to creating high contrast black and white imagery, and that is my primary reason for shooting in IR, however it can also be used to create ‘false colour’ images – you know, the ones where you still see the blue sky against a fairly stark near-monochrome landscape.  I’m mainly going to cover processing to get a nice high contrast black and white image out the other side, but will touch on false-colour at the end.

    So, if you’ve been out shooting with the Hoya R72. using the coolest white balance possible, e.g. 2500 K, you should have ended up with an image like this, below.

    Infrared Processing Raw Output

    This was shot at 70mm, f/5.0, 13.0 seconds at ISO640.  In my last post I touched upon the need for longer shutter speeds due to the reduced sensitivity of the sensor to IR.  Here, I pumped the ISO and opened the aperture pretty wide in order to keep the shutter speed from being too long – after all, I was hoping for a crisp reflection in the lake.  You can see the output is dominated by bright magenta tones.  This is typical of an IR raw out of the Nikon D800.  When I used to shoot with the D7100, the sensitivity was even further reduced (i.e. needed longer shutter speeds/higher ISO) and the output was typically much more reddish, so it’s probably fair to say that your output may vary depending on your camera/sensor.

    It’s also worth saying that this is the kind of subject matter that I find suits IR perfectly – trees, clear sky, water, brickwork.  The colour version of this image, without the IR filter on, was much less captivating – bland shadowy trees, distracting colours that weren’t adding anything.  I don’t have a like-for-like comparison to the shot we’re walking through, but I have these two below to show the difference.

    Infrared Processing Comparison 1 Infrared Processing Comparison 2

    Anyway, back on with the processing.  The first step in the processing workflow is to neutralise the magenta colour cast.  You could process straight on to mono without correcting it, but if you do want to go the false colour route, you’ll be left with a cast that you can’t remove.  To neutralise the colour cast, I follow this tutorial from David Clapp. You only need to go through it once, and then you’ll have a preset camera profile in Lightroom for any future IR image.  Once the new preset is applied, the image will look something like the below, but now have a colour temperature of around 6900K in Lightroom, giving you plenty of flexibility to make it cooler still to neutralise the greens.

    Infrared Processing Profile Appiled

    The intention is for the greens to be rendered as white, so the next step is to use the colour picker, and select any foliage in the image. This will then try to neutralise those tones, turning the foliage white.  If you do this, the image should look like the below.  You will see residual colour in the sky and in some of the foliage, and that colour is the basis of the false colour IR images that you see.  We will come on to that in a bit.

    Infrared Processing White Balance

    At this point, the processing can go one of two ways, black and white or false colour…

    Black and White

    To perform the B&W conversion, you can use whatever technique you usually use.  I flip between using the B&W conversion within Lightroom or using Silver Efex Pro depending on the individual image.  The image below is a straight Lightroom conversion, with some levels adjustments, some tweaking to the ‘black and white mix’ to make use of the yellow tones in the sky to give more contrast, and a small crop.  Generally, the hard work to give the high contrast B&W image is done in camera through use of the filter, so there is never really a need to push it too hard which ever way you prefer to do the conversion.

    Infrared Processing Mono Lake Vyrnwy

    False Colour

    False colour is a route I don’t frequently go down.  When done well, I think the images can look fantastic, if a little surreal, however I can just never achieve a level of finish that I am comfortable with.  To achieve the false colour look, again I follow another tutorial by David Clapp.  It’s basically a case of doing a colour channel swap, where you swap the reds and blues.  The result is that the yellowish sky, from above, will take on a blue hue, and the foliage will take on red hues, giving the result below:

    Infreared Processing Falso Colour

    This has been reigned in a little in terms of saturation as the straight output is far too unnatural (as if the whole thing isn’t unnatrual, I know).  But I’m still not to keen on the result, I think it needs more work.

    If you want to see what false colour IR should look like, take a look at David Clapp’s gallery, here – some incredible work on show, producing some stark, stylised landscape imagery.

    I think it’s also worth drawing attention to Russ Barnes’ “Backwater” collection at this point.  They are a series of colour infrared images that look to be being used almost straight out of the camera, following the white balance neutralisation above.  No B&W conversion or colour channel swapping, and the result is fantastic, a limited colour palette that leaves the viewer concentrating on the texture and tonality, whilst still being richer than straight monochrome.

    Anyway, I think that’s about it from me.  I just wanted to share the process I use to generate infrared images, with a Hoya R72 filter, to help others who are just starting out exploring the technique.  In this post, and the previous one, I’ve included links to the resources that helped me find my way and I hope they can help others on their IR journeys.  If you have other resources that you find invaluable, or have questions about anything I’ve shared, please do get in touch.

  • Infrared Photography with the Hoya R72 filter

    Infrared Photography with the Hoya R72 filter

    I find myself really drawn to infrared photography. There is something about the naturally high contrast black and white images that IR can produce that just aren’t possible when shooting normally, with the visible spectrum. This is especially true in the landscape where foliage can be rendered bright white and blue skies turn black resulting in images that aren’t necessarily obviously IR to the viewer and will hold the viewer’s attention just that little bit longer.

    You can see what I mean by checking out the portfolios of Russ Barnes, Lee Acaster, Matthew Dartford and Justin Minns. I have nothing but admiration for the landscape work by these guys, but I find their IR stuff particularly special.  It’s never used as a gimmick, but always to produce intriguing landscape images.

    Inspired by this, about 18 months ago I decided to try my hand at IR and picked up a Hoya R72 screw on filter.  Now, there was a definite learning curve associated with using IR and I found useful web based resources to be scant, so I thought I would try and put something together here to round up the useful links I’ve used, plus try and share what I’ve learnt along the way.

    Lake Vyrnwy - Infrared Hoya R72 Clappergate Bridge - Infrared Hoya R72


    The Filter

    The Hoya R72 IR filter is  probably the cheapest/easiest way to experiment with IR photography. It is a screw on filter designed to absorb most of the visible light, transmitting only the infrared light at 720nm.

    The small complication with using this filter is that most modern camera sensors have some degree of infrared blocking built in to maximise image quality when shooting the visible spectrum. As such, whilst all sensors are sensitive to IR light, the sensitivity will vary from camera-to-camera.

    I’ve used the Hoya R72 with two Nikon bodies – the D7100 and the D800.  On the whole, I’d say that the Nikon IR sensitivity is poor – on my D800, it works out to be anywhere from 8-12 stops difference in exposure between images shot with and without the filter.  As such, IR photography with the Hoya R72 is comfortably in the realm of ‘long exposures’ when shooting with the latest Nikon bodies (I say that as I believe earlier Nikon bodies don’t have the same degree of IR blocking and can shoot closer to the native exposure).  This is fine, it just means that handheld shooting isn’t an option and movement in foliage/clouds is almost inevitable in all but the brightest light.  Generally, if I want to shoot at low ISO I find it’s often in the 20-30 second range, usually more.

    One thing I have noticed also is that the metering is also less accurate when using this filter.  If shooting in aperture priority mode, letting the camera determine the exposure, I find I have to apply around +4 stops exposure compensation to obtain a correctly exposed image.  Again, no problem as once you know this is the case, it just becomes part of the workflow.

    Lens Hotspots

    Lens hotspots are one of the most irritating aspects of shooting infrared and were something I was completely unaware of until I started trying to make IR images. The hotspot appears in the centre of the image, often as an over-exposed, colour-shifted, low contrast circle, or spot. They are an artefact of each individual lens (potentially either reflections from the internal lens coatings or just from the lens elements themselves) and if present, are impossible to overcome. The hotspots typically get worse as you stop down to smaller apertures with the shape of the lens aperture leaves becoming more pronounced in the outline of the spot as it becomes more defined.

    The image below was shot at f/7.1 (with the Tokina 12-24mm f/4), and you can see the resulting hot spot in the centre of the image.

    Infrared Hotspot

    Some lenses that exhibit hot spots at ‘typical landscape apertures’ may be passable much wider open (e.g. f/4), but that obviously brings its own complications depending on what you are trying to shoot.

    The best resource for researching lens hotspots that I’ve found is this Kolarivision page.  The page comes with some disclaimers, but on the whole my experiences align with their assessment of lens performance.  It is worth noting that even if a lens appears on their ‘good’ list, if you stop it down far enough, you may well still experience hotspots.

    It’s one of those things that is worth checking out and understanding under controlled conditions before you get out in the field. The hot spots can be hard to detect on the back of the camera, and it’s then only once you’re back in front of a computer you realise the images are spoilt. For info, my favourite lens for shooting IR is my 70-200mm f/2.8 VRI. I’ve never seen a hotspot from it, so I feel like I don’t need to worry at all when out shooting.

    White Balance

    It goes without saying that shooting raw makes a lot of white balance issues trivial, however the processing of IR images involves some manipulation of the white balance during processing, so I find it’s best to start out with the ‘right’ setting in camera.  A lot of online resources tell you to point the camera at some foliage and perform a manual white balance calibration (as under IR conditions, they will render as white/neutral) however given the aforementioned sensitivity compromises introduced when shooting IR, this doesn’t necessarily work unless under the brightest of midday suns.

    As such, it is best to manually set the white balance to 2500 K. This gives you a raw file that is ready to be processed (I will come on to processing later on.) – typically reddish/purple in colour.  The straight-out-of-the-camera version of the header image from this blog post, before processing, is shown below:

    Infrared Straight out of the camera

    Exposure

    As previously mentioned, there will be some exposure compensation required to achieve a correctly exposed image and use of the histogram is as valuable as ever for monitoring the exposure of the images. Given the red/purple hues of the images being recorded, I find it wise to monitor the red channel specifically (rather than the default RGB) to ensure that the highlights are not clipped in the red channel, giving data loss of your highlights – if monitoring RBG, the clipped red channel may not be obvious until it is too late.

    Workflow

    As previously mentioned, the IR sensitivity limitations of Nikon sensors push IR photography firmly into the long exposure realm. As such, I find a similar workflow to my long exposure photography works well.

    That is: using a tripod/remote shutter release, composing and focussing without the filter, switching to manual focus (to prevent any focus hunting once the filter is attached), screw on the filter, determine the exposure time for the given ISO (and tweak as appropriate, depending on shutter speed requirements), shoot.

    Hitchin Lavender - Infrared Hoya R72Trees - Infrared Hoya R72Bamburgh Castle - Infrared Hoya R72


    To be continued….

    That’s enough for this post, covering the practical aspects of shooting IR.  I’ll cover the processing side of things in a follow up post in the new year.

  • My Back-Up Regime

    My Back-Up Regime

    I’m a firm believer of ‘backing up’.  If someone mentions that they suffered a hard drive failure and lost all of their images, but did not have a back up, I would not give them much sympathy and probably also ‘roll my eyes’ and give a ‘you should have kept a back up’ speech.

    However, from on my high horse, I’m aware that in the past, my back-up habits have been pretty lax, and actually, after suffering two independent failures (of an external drive and an unbootable iMac) I have been very lucky to have not lost anything.

    I was thinking about this a couple of months ago, and realised the biggest barrier to backing up my images was me.  I would put it off almost indefinitely, or just plain forget, meaning that when I did remember to finally make a back up, it was a huge job.  Therefore I realised I needed a fully automated system that required zero input from me and that would regularly make a full back up of my Lightroom catalogue and image files.

    Fast forward a couple of months and I have a system that has been working flawlessly, so I thought I would share my set up, and a couple of tips required to get it working smoothly.  I am a Mac user, so the software and techniques used here are all OS X specific (I’m certain a similar set up could be achieved under Windows, however there are better folk to ask than I on that matter).

    Back Up Regime Overview


    The Set Up

    The key to a good back up system is redundancy.  That is, more than one back up, hopefully in more than one place.  My aim was to have a three-tier approach:

    1.     Full back up to a local external hard drive (connected by USB)

    2.     Full back up to a networked hard drive somewhere else in the house

    3.     Back up to the ‘cloud’

    This would provide two back ups within my home, in two different locations, and a third external to my home network. This would mean that if I suffer a single hard drive failure at home, I have a second back up and if I suffer a catastrophe in which both home-based back ups are lost, the cloud storage will come to the rescue.

    Let me go through each in turn.

    1. Local back up

    The local back up is made to a 1 Tb external hard drive that is attached to my Mac by USB.

    OS X ships with some software called Time Machine.  It is typical of Apple software in that it is very user friendly, fairly idiot proof, but not very customisable.  The idea is that all you have to do, as the user, is open up the Time Machine preference pane (in System Preferences), point it at an external drive and hit go.

    Back Up Regime Time Machine

    It will then make incremental back ups of your entire hard drive, keeping hourly back ups for the past 24 hours, daily back ups for the past month and then weekly back ups for all previous months.  Then, when you realise you need a file that you deleted, you can just invoke Time Machine, open a particular folder where the file was stored and roll back through time until the point before you deleted it.

    It’s ideal for system wide back up as all documents, not just my images, are protected and after I set it going, I’ve never had to think about it again.

    2. Networked back up

    I’m a big networked storage fan.  I like the idea of being able to access my media, whether it is music, videos or images, from anywhere in the house on any device.  Therefore, I’ve had a NAS drive (network attached storage, (I happily recommend the Synology range of NAS drives for features, usability and price)) for a few years, but until recently I had never automated the back ups (if you buy a compatible NAS, you can use Time Machine across your home network however I wanted a secondary back up, solely of my images and Lightroom catalogue, and I’m not aware that you can set up a second instance of Time Machine, for a single folder).

    That is where an app called Carbon Copy Cloner (CCC – £27.95) comes in.  CCC is widely regarded as one of the best back up applications for OS X.  Its capability ranges from being able to copy the contents of one folder to making bootable copies of entire hard drives.

    Back UP Regime Carbon Copy Cloner

    I only wanted to make incremental back ups of one folder, my Lightroom folder (which, due to how I manage my images contains both the catalogue and raw files), on a weekly basis.  I figured that I often add images to my Lightroom catalogue at least once a week, so I decided to take a low risk approach, and copy any new items across to my back up – this would ensure that any new images are backed up, changes to existing images are backed up, but any images that are deleted from Lightroom will remain (more of that ‘just in case’ mindset of protecting against accidental deletion).

    Back Up Regime CCC Scheduling

    CCC can handle all of that with ease, and even allows you to schedule the back up to be performed at a defined interval.  The only limiting factor was ensuring that the NAS drive was mounted. To use a network drive on OS X, you need to ‘mount’ it first (hit cmd+k in Finder and a dialog box will come up, put the network address of the NAS drive in, hit enter) but when mounted, it acts like any other drive/folder.

    If the drive isn’t mounted, CCC won’t be able to perform the back up.  Therefore, to ensure that the drive is always mounted prior to the scheduled back up time, I decided to put together a brief Automator action to mount the NAS drive (Automator is an OS X app that allows you to build basic programs from a defined set of actions, in a friendly, non-script based GUI).

    Back Up Regime Automator

    A picture of the Automator action is given above, to show just how simple it is.  It only consists of two of the default actions: ‘Get Specified Servers’ and ‘Connect to Servers’.  I saved the Automator action as an app, then used iCal to automatically run that app, once a week, 15 minutes ahead of the scheduled back-up.

    CCC + Automator + iCal removes me from the equation.  The process is fully automated, so I now just wake up on a Sunday morning to an email confirmation from CCC to say that the back up was successful.  The first back up took approx 48 hours (copying 130 Gb!) however, the weekly back up is now fairly quick, only copying across files that have changed within that one week period.

    3. The cloud

    So this is where my ‘preaching’ about backing up comes to an end.  A confession: I have yet to work out my cloud back up procedure.

    I’m not sure I need want to back up over 130Gb of raw files, it just doesn’t seem practical, however I realise I need to do something.  Using Zenfolio as a web site service allows me to keep full size, high quality JPEGs of the images I share through my web site on external servers, but I see this only as a short term solution to my cloud back up needs.

    Amazon Glacier (as mentioned by Doug Chinnery, here) seems to be an ideal service, but I have yet to make the leap and start the process.  I think I need to work out a way of filtering what I back up, but even if I did back up my entire library, it would cost me less than $20 a year.  Given that is the cost of a few pints of beer, the decision should be an easy one, however I think it’s more the sorting of files to start the upload process that is the barrier!

    I realise that without the off-site back up plan in place, my two home-based back ups are of limited use and I am still vulnerable to loss, however my system is in a much better state than it was 12 months ago.  Now I just need to motivate myself to upgrade my two-tier back up plan to the three-tier system I was aiming for.

    If you perform a regular back up to the cloud, please explain your system in the comments.  I would love to hear what other folk do about an ‘off site’ back up, whether you back up every raw file in your library or just small selection of raw files?  Whether you use Glacier, or other services such as Crash Plan or even Dropbox?  Either way, I hope this post is of some use to other Mac users, looking to implement an automated back up system that requires zero intervention.

  • Isle of Skye Photography Guide (Part 2)

    Isle of Skye Photography Guide (Part 2)

    This is part 2 of my Isle of Skye trip report/location guide.  Please see this post for the first half.

    Neist Point

    Neist Point lighthouse is the most westerly tip of the Isle of Skye, and probably the longest drive I had to make to any of the locations on my trip.  The westerly orientation make this an ideal spot to photograph at sunset.  I was aiming to get there an hour or so before sunset and stop for some food on the way, however it soon became apparent that there weren’t all that many pubs/cafes once off of the main road (for info, the Red Roof Cafe, in Glendale, was the final food serving establishment en route to Neist Point (and I thoroughly recommend their “Gamekeepers Ploughmans”!)).  That left me with a good couple of hours at Neist Point which was more than enough time to take a walk down to the lighthouse and back up to the cliffs to determine a decent composition.

    Having been lucky with the light earlier in the day, at The Quiraing, I was further rewarded with a fantastic sunset:

    Neist Point

    I hung around until the sun had completely disappeared and took a panorama of the deep orange horizon over Uist.

    Sunset from Neist Point

     Sligachan

    The next morning was to be my final sunrise session of my trip, and after a couple of mornings getting up a couple of hours before sunrise, I decided to spend the morning very close to my hotel, around Sligachan, affording myself a relative lie-in.  I had spent the previous afternoon scouting places in and around the river Sligachan and Allt Dearg Mor, but my first stop was Loch Nan Eilean, a small lochan easily seen from the A863 a short 10 minute walk (or 2 minute drive!) from Hotel Sligachan.

    Loch nan Eilean Relfections

    From Loch Nan Eilean, I went back towards Sligachan but stopped at the small layby to pick up the footpath heading south-west.  A short 5 minute walk from the road is a series of small waterfalls/cascades of Allt Dearg Mor, that make the perfect foreground for the Cuillin range behind:

    Allt Dearg Mor II

    After a good hour or so walking up and down the river, I then headed back to Hotel Sligachan, initially thinking about breakfast, but decided to cross the road over to the river to see what the photographic opportunities were like.  It was then that I saw a frozen pond, reflecting the clear blue sky and the Cuillin mountains, filled with yellow reeds.  I spent a further 30 minutes here working on different compositions, and came away with what is my favourite image from my entire trip (taken less than 30m from the room in which I was staying!):

    Sligachan Sunrise

     Sea Eagle Boat Trip

    The middle of the day can be tough when taking landscape photographs, the sun is often too high in the sky, giving very harsh shadows.  Therefore, I decided to try and take in some of the wildlife that can be seen in and around Skye, and take a boat trip to see the White Tailed Sea Eagles.  I had read good reviews of the Brigadoon Boat Trips (they sail from Portree), so decided to book on a trip out in to the Sound of Rasaay to try and photograph the Sea Eagles.

    The Brigadoon Boat Trips quote a 90-odd% success rate for seeing the Se Eagles, and I wasn’t disappointed.  We saw three in total, a new young pair and an older more established male.  The problem was that the new pair were trying make a bid for territory, so were perched on a rock, intent on not moving.  The older male, was also set on watching the new pair, ensuring they were aware of his presence, but not flying.  That meant that none of the birds took to the air whilst we were watching, which was a shame, but we did manage to make a couple of fairly close passes allowing to take these images:

    [two_columns]
    [column1]

    White tailed sea eagles, Skye

    [/column1]
    [column2]

    White tailed sea eagles, Skye

    [/column2]
    [/two_columns]

    It was a shame that I didn’t get to see the eagles take any fish from the water, but was impressive to see these huge birds none-the-less.

    Duntulm Bay

    I wanted to try a location that was a little different for sunset on my final evening, so went up to the northern tip of the Trotternish peninsula to Duntulm Bay.  It’s quite a small bay, but is covered in huge round pebbles (more boulders, than pebbles actually).  This was the first time that my 10-stop filter was used for this whole trip:

    Duntulm Bay

    The sunset never did materialise as the weather deteriorated into a drizzly, cloudy evening,so it was back to the hotel to pack ready for my trip back the following day.

    Goodbye to Skye

    To get to Inverness airport in time for my flight I had to be up and on the road before sunrise.  I was on the road, heading for the  Skye bridge when I saw the mountains of mainland Scotland against the pre-dawn sky.  My tripod was packed away in my suitcase, so using my telephoto lens, and the trusty image stabilisation, I was able to make this panorama (7 images, handheld, ISO320, f/11, 1/15th sec) – I’m a sucker for layers:

    Layers of Twilight

    So that was the final image from my trip to Skye.  4 days (well, 3.5) wasn’t really enough to do the island justice, so I’m certain at some point I will go back.  I found that taking the time off work and booking a dedicated photography trip meant that I put a lot of pressure on myself to come away with some ‘decent’ images.  I haven’t finished processing all of the images I want to, but from what I have shared so far, I am quite pleased with the results.

    Not knowing the area at all for this trip meant that I aimed for the more well known locations, often spotting other places on the way, but not stopping for having to get to a location.  I’m very eager to go back and further explore the potential beyond the locations shared here, but for the mean time, I hope that this trip report/location guide comes in useful for other folk planning their first trip to Skye.


  • Isle of Skye Photography Guide (Part 1)

    Isle of Skye Photography Guide (Part 1)


    Back in April, I was lucky enough to spend 4 days on the Isle of Skye. My wife and I were due to be near Glasgow for the weekend for a friend’s wedding and I decided that, given I would already have flown ‘most’ of the way (i.e. from south-east England to Glasgow), I would extend my trip by a few days and travel on to Skye.

    Skye is an island of the Inner Hebrides, off the west coast of Scotland. It is home to a wealth of different landscapes including the coast, lochs, waterfalls and mountain ranges, all on a scale rarely seen in the UK. For that reason, it had been on my wish list to photograph for a long time, so I jumped at the opportunity to go. Before planning this trip, I didn’t really know the geography of Skye that well. I knew a number of the well photographed locations, but had to do a lot of research into planning potential locations for my time there. Therefore, I wanted to write a trip report/location guide to help anyone else who is planning a similar trip.

    (At this point, I feel that I need to share this link to Nick Cockman’s Skye location guide. Whilst this, and the up-coming subsequent post were languishing in my drafts folder for months, Nick recently published a very comprehensive guide to locations of Skye just a week ago. It was a good read, and finally pushed me to finish and publish these posts, so do go and take a read).

    Below, I’ve written the first half of this guide, discussing the various locations that I visited, accompanied by at least one image from each place. I’ve added the locations (either the actual place, or where more useful the easiest place to park a car) to the Google map below:

    View Skye Location Guide in a larger map

    First up, accommodation. Not knowing Skye well, I was looking for accommodation fairly close to the centre of the island, and soon came across Hotel Sligachan (red marker on the map above). It’s located a few miles north of Broadford on one of the main roads (A87) that travels north/south, as well as being situated at the junction with one of the main roads leading to the north-west of the island (A863). That makes this the perfect place to stay if you intend to visit Skye, as most locations on the island can be reached within a one hour car journey from Hotel Sligachan (in fact, I was able to be out at a location for sunrise, shoot for a couple of hours and still make it back in time for the breakfast on a couple of occasions!).

    On to the locations…

    Elgol

    I spent my first evening down at the village of Elgol. It is a coastal village on the tip of the Strathaird penninsula (western side of the island) that is famed for its rocky shoreline (popularised by Joe Cornish and a round boulder, I believe). Luckily, it is worth a visit in any weather, as the conditions were not particularly kind with fairly constant rain, however, with some nifty use of an umbrella and a lens cloth, I was able to keep my ND grads free from water droplets. I arrived to find that I had the beach to myself (which must be a fairly rare occurence, given that everyone visits Elgol) just as the tide turned and started to go out – perfect for a couple of hours exploration.

    Elgol II

    If you make the trip to Elgol, it is worth considering stopping along the way, at Loch Cill Chriosd. It is a more understated location than some of the other popular spots on Skye, however the reed filled loch has a lot of potential for great images.

    Old Man of Storr

    A token mention for the Old Man of Storr here. The Old Man of Storr is one of the instantly recognisable locations on Skye. It is probably over photographed, however, it was a place I just had to see for myself. I planned to walk up to the Old Man for sunrise on my first morning ton the Island, however, after getting in the car and driving the 40 or so minutes from Sligachan, I found myself in the middle of a heavy snow storm with no sign of sunrise on the horizon (the forecast for the day wasn’t pretty!). As I hadn’t had chance to scope out the path before hand (though I believe it is fairly straightforward) I decided to give it a miss, and return to my bed in the hope of friendlier weather when I awoke.

    Fairy Pools

    No such joy! Rain had set in for the day, so I decided to take advantage of the poor weather and head to the Fairy Pools. I love photographing waterfalls and in most instances, overcast/wet weather is favourable. After finding the car park (marked on the map above), it is a short walk across the road down to the River Brittle and the path that winds up the mountain side, revealing lots of bright aqua-ablue pools and water falls. It’s very easy to spend an afternoon here, well worth a visit (a polariser is essential).

    Fairy Pools, Skye

    The Quiraing

    Another one of the ‘big’ landmarks on Skye that is best visited at sunrise. I had only scoped the location on maps before this visit, so didn’t really have any idea how far I would need to walk from the road to get to where I wanted to be. Therefore, I arrived about 1hr 15 mins before sunrise to ensure I would plenty of time to scout the area (in the dark) and work out where to go. From the marker indicated on the map, it was literally a case of crossing the road and following a footpath for about 5 minutes before I was confronted with the silhouette of The Needle:

    The Needle, Quiraing, Skye

    That meant I had plenty of time before sunrise to scout around and take advantage of the blue tones of twilight before waiting for the sun to crest the horizon and spending the next hour exploring the area. This is looking south, towards Cleat and Bioda Buidhe:

    View from the Quiraing

    And this is looking west towards The Needle and The Prison:

    Looking Across the Quiraing, Skye

    The Faerie Glen

    This is a really bizarre little place, seemingly in the middle of nowhere. One minute you’re driving along a tiny road filled with sheep (though that could be said for a lot of roads on Skye), the next you are confronted by what looks to be a “mini-Quiraing” sitting behind a tiny lake. I only visited after spending a long while at The (actual) Quiraing, so the light was fairly harsh:

    Faerie Glenn

    That takes me up to the mid-point of my tip, so to save this post getting too long, I have split the remaining locations out into a second post, that I will publish in the coming days. Please check back soon to take a look.