I’m a firm believer of ‘backing up’. If someone mentions that they suffered a hard drive failure and lost all of their images, but did not have a back up, I would not give them much sympathy and probably also ‘roll my eyes’ and give a ‘you should have kept a back up’ speech.
However, from on my high horse, I’m aware that in the past, my back-up habits have been pretty lax, and actually, after suffering two independent failures (of an external drive and an unbootable iMac) I have been very lucky to have not lost anything.
I was thinking about this a couple of months ago, and realised the biggest barrier to backing up my images was me. I would put it off almost indefinitely, or just plain forget, meaning that when I did remember to finally make a back up, it was a huge job. Therefore I realised I needed a fully automated system that required zero input from me and that would regularly make a full back up of my Lightroom catalogue and image files.
Fast forward a couple of months and I have a system that has been working flawlessly, so I thought I would share my set up, and a couple of tips required to get it working smoothly. I am a Mac user, so the software and techniques used here are all OS X specific (I’m certain a similar set up could be achieved under Windows, however there are better folk to ask than I on that matter).
The Set Up
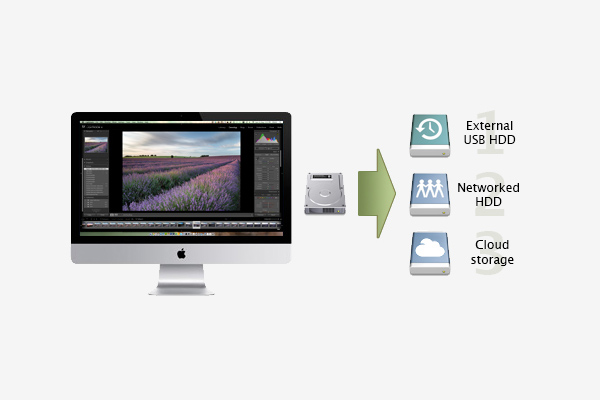
The key to a good back up system is redundancy. That is, more than one back up, hopefully in more than one place. My aim was to have a three-tier approach:
1. Full back up to a local external hard drive (connected by USB)
2. Full back up to a networked hard drive somewhere else in the house
3. Back up to the ‘cloud’
This would provide two back ups within my home, in two different locations, and a third external to my home network. This would mean that if I suffer a single hard drive failure at home, I have a second back up and if I suffer a catastrophe in which both home-based back ups are lost, the cloud storage will come to the rescue.
Let me go through each in turn.
1. Local back up
The local back up is made to a 1 Tb external hard drive that is attached to my Mac by USB.
OS X ships with some software called Time Machine. It is typical of Apple software in that it is very user friendly, fairly idiot proof, but not very customisable. The idea is that all you have to do, as the user, is open up the Time Machine preference pane (in System Preferences), point it at an external drive and hit go.
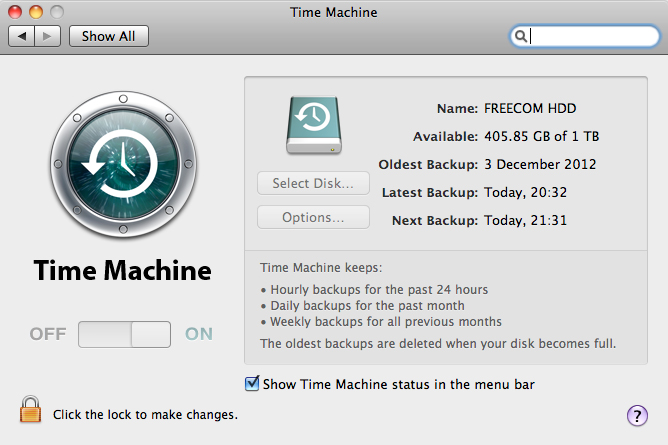
It will then make incremental back ups of your entire hard drive, keeping hourly back ups for the past 24 hours, daily back ups for the past month and then weekly back ups for all previous months. Then, when you realise you need a file that you deleted, you can just invoke Time Machine, open a particular folder where the file was stored and roll back through time until the point before you deleted it.
It’s ideal for system wide back up as all documents, not just my images, are protected and after I set it going, I’ve never had to think about it again.
2. Networked back up
I’m a big networked storage fan. I like the idea of being able to access my media, whether it is music, videos or images, from anywhere in the house on any device. Therefore, I’ve had a NAS drive (network attached storage, (I happily recommend the Synology range of NAS drives for features, usability and price)) for a few years, but until recently I had never automated the back ups (if you buy a compatible NAS, you can use Time Machine across your home network however I wanted a secondary back up, solely of my images and Lightroom catalogue, and I’m not aware that you can set up a second instance of Time Machine, for a single folder).
That is where an app called Carbon Copy Cloner (CCC – £27.95) comes in. CCC is widely regarded as one of the best back up applications for OS X. Its capability ranges from being able to copy the contents of one folder to making bootable copies of entire hard drives.
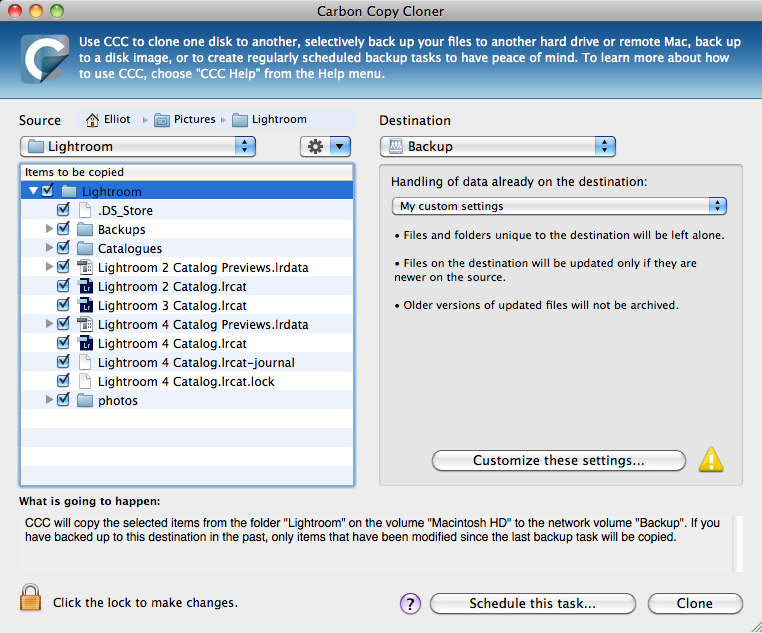
I only wanted to make incremental back ups of one folder, my Lightroom folder (which, due to how I manage my images contains both the catalogue and raw files), on a weekly basis. I figured that I often add images to my Lightroom catalogue at least once a week, so I decided to take a low risk approach, and copy any new items across to my back up – this would ensure that any new images are backed up, changes to existing images are backed up, but any images that are deleted from Lightroom will remain (more of that ‘just in case’ mindset of protecting against accidental deletion).
CCC can handle all of that with ease, and even allows you to schedule the back up to be performed at a defined interval. The only limiting factor was ensuring that the NAS drive was mounted. To use a network drive on OS X, you need to ‘mount’ it first (hit cmd+k in Finder and a dialog box will come up, put the network address of the NAS drive in, hit enter) but when mounted, it acts like any other drive/folder.
If the drive isn’t mounted, CCC won’t be able to perform the back up. Therefore, to ensure that the drive is always mounted prior to the scheduled back up time, I decided to put together a brief Automator action to mount the NAS drive (Automator is an OS X app that allows you to build basic programs from a defined set of actions, in a friendly, non-script based GUI).
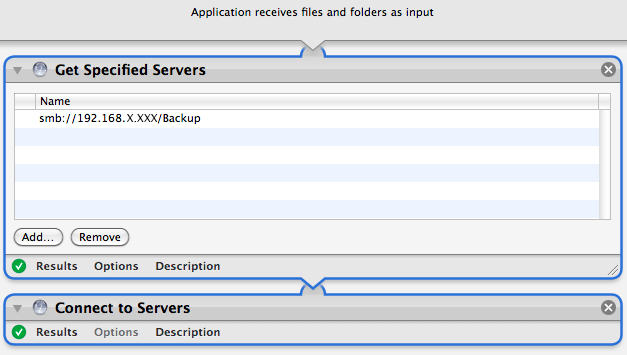
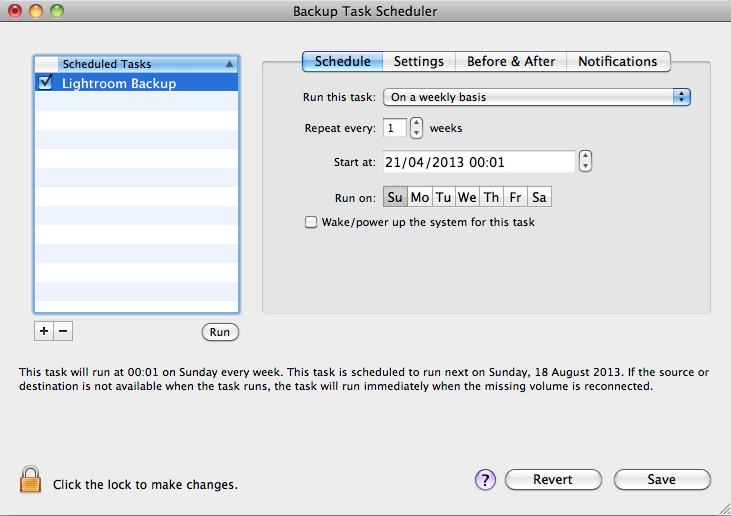
A picture of the Automator action is given above, to show just how simple it is. It only consists of two of the default actions: ‘Get Specified Servers’ and ‘Connect to Servers’. I saved the Automator action as an app, then used iCal to automatically run that app, once a week, 15 minutes ahead of the scheduled back-up.
CCC + Automator + iCal removes me from the equation. The process is fully automated, so I now just wake up on a Sunday morning to an email confirmation from CCC to say that the back up was successful. The first back up took approx 48 hours (copying 130 Gb!) however, the weekly back up is now fairly quick, only copying across files that have changed within that one week period.
3. The cloud
So this is where my ‘preaching’ about backing up comes to an end. A confession: I have yet to work out my cloud back up procedure.
I’m not sure I need want to back up over 130Gb of raw files, it just doesn’t seem practical, however I realise I need to do something. Using Zenfolio as a web site service allows me to keep full size, high quality JPEGs of the images I share through my web site on external servers, but I see this only as a short term solution to my cloud back up needs.
Amazon Glacier (as mentioned by Doug Chinnery, here) seems to be an ideal service, but I have yet to make the leap and start the process. I think I need to work out a way of filtering what I back up, but even if I did back up my entire library, it would cost me less than $20 a year. Given that is the cost of a few pints of beer, the decision should be an easy one, however I think it’s more the sorting of files to start the upload process that is the barrier!
I realise that without the off-site back up plan in place, my two home-based back ups are of limited use and I am still vulnerable to loss, however my system is in a much better state than it was 12 months ago. Now I just need to motivate myself to upgrade my two-tier back up plan to the three-tier system I was aiming for.
If you perform a regular back up to the cloud, please explain your system in the comments. I would love to hear what other folk do about an ‘off site’ back up, whether you back up every raw file in your library or just small selection of raw files? Whether you use Glacier, or other services such as Crash Plan or even Dropbox? Either way, I hope this post is of some use to other Mac users, looking to implement an automated back up system that requires zero intervention.