Category: iceland

  • Photographing the Laugavegur Trail – The Photographs

    Photographing the Laugavegur Trail – The Photographs

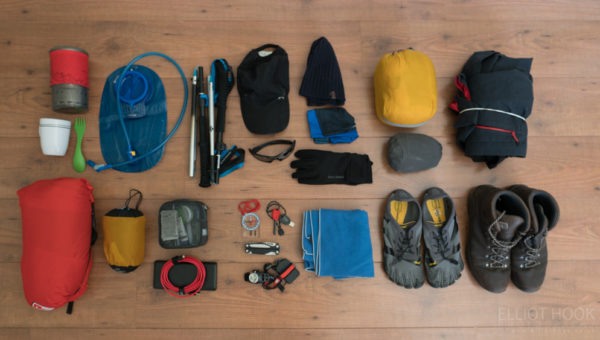
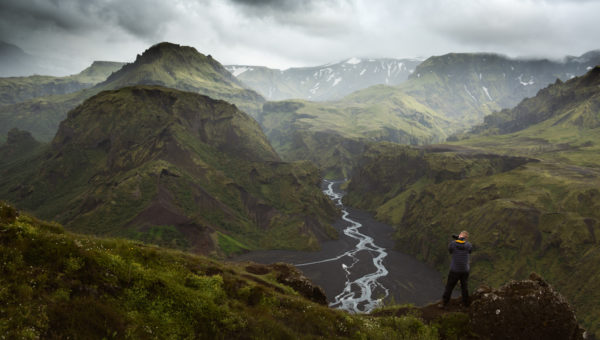
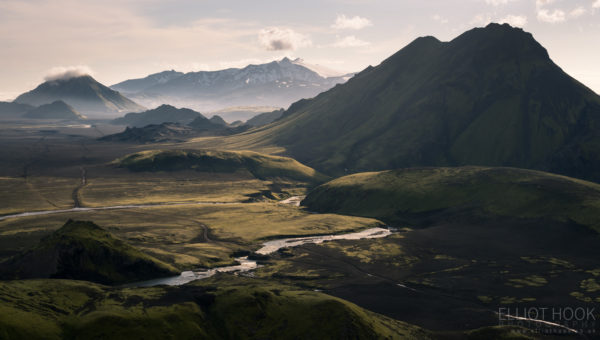
    Following on from my previous two posts on hiking the Laugavegur trail last year, this post contains my favourite images from that trip.  We did the hike back in August 2018 (having started planning in the previous January), so this is clearly a good few months on to only just be sharing images.

    That may seem odd, but this trip took a lot of planning and consumed a lot of my thoughts in the months leading up to it so expectations were high, and it can take a while for those expectations to be managed once you get back and offload a few memory cards worth of images.  You can obviously never expect to get the ‘perfect weather’ that you hope for.  The chances of actually being in the right place at the right time, on a first visit, where you are scoping out locations as you go are very slim.  So the reality is often very different to what you spent numerous months imagining.  And whilst experience helps you know this before you even set off, it still leads to a challenging period of reflection and objectivity when you look back through the images made.  So I’ve spent a little while with these, but it’s about time I stop procrastinating and share them…

    I didn’t really get anything interesting from Landmannalaugar, so the first images are from day 1 of the hike, up near Hrafntinnusker.  As we started the hike, it was raining and as we were hiking from Landmannalaugar through to Álftavatn in a single day, we decided not to stop to take images with cameras for most of the day – keeping kit dry was a priority and we could have easily spent a lot of time faffing about en route when we had a full day of walking to complete.  I was using my phone to take images as we walked, however, and they really do make me wish I’d stopped to take a few ‘proper’ images:

    The scenery on that first day was incredible, constantly changing.  From geothermal, rhyolite hills out of Landmannalaugar through the snow fields around Hrafntinnusker.  But it was when we got to the ridge above Jökultungar that we could see the green and black landscape often associated with this trail stretch out in front of us, including a number of landmarks that were to accompany us over the next couple of days.  The panorama below captures the path on to Álftavatn (centre) with Stórasúla, Stórkonufell and Hattfell beyond.

    Laugavegur Jökultungur Panorama

    This kind of spot is perfect for isolating interesting portions of the wider landscape with a telephoto lens, so that’s exactly what spent a bit of time doing.  First up, is the Álftavatn huts with Stórasúla on the left.  Then two shots looking down the Torfakvísl valley.

    View from Jokultungur on the Laugavegur trail

    [two_columns]
    [column1]
    View from jokultungur on the Laugavegur trail
    [/column1]
    [column2]
    View from Jokultungur on the Laugavegur trail
    [/column2]
    [/two_columns]

    We really should have stayed here a little longer to see how the light changed but we instead made our descent towards our first river crossing, of Grashagakvísl (below), and on to our hut for the night.

    River Grashagakvisl en route to Alftavatn hut

    The next day, we only had a short walk to Hvanngil so we could make use of the time and energy to photograph the area.  En route to Hvanngil, shortly after another river crossing (Bratthálskvísl), we came across this moss lined stream, flowing towards Stórasúla and couldn’t resist the contrast of the greens giving the natural lead in to Stórasúla and Stórkonufell beyond.

    Storasula on the Laugavegur trail

    From Hvanngil, a short sharp climb got us to the top of Hvanngilshausar, our location for sunset, giving views of both the “angelic valley”, from which Hvanngil gets its name, and the basalt flats that were to be hiked the following day.  On the left, Stórasúla and the Kaldaklofskvísl river with the trail crossing the river by bridge before stretching out over the black desert.  On the right, Stórkonufell in the early evening light with the ice cap of Eyjafjallajökull behind.

    [two_columns]
    [column1]

    Views of Storasula from Hvanngilshausar on the Laugavegur trail

    [/column1]
    [column2]

    Storkonufell from Hvanngilshausar on the Laugavegur trail

    [/column2]
    [/two_columns]

    Followed by some views down the valley of Hvanngil as the sun started set later into the evening.

    Valley of Hvanngil from Hvanngilshausar

    [two_columns_33_66]
    [column1]

    Storasula from Hvanngilshausar on the Laugavegur trail

    [/column1]
    [column2]

    Storasula from Hvanngilshausar on the Laugavegur trail

    [/column2]
    [/two_columns_33_66]

    Storasula from Hvanngilshausar on the Laugavegur trail

    As we started to descend to head back to the hut, the low lying cloud that had been in the background of our photos all evening started to roll across the basalt flats towards us, eventually filling the valley with what must have been a full temperature inversion.  We didn’t really make the most of it, but I was able to capture Stórkonufell against a twilight sky, surrounded by clouds…

    Storkonufell cloud inversion on the Laugavegur trail

    As well as the huts of Hvanngil, set against the hillside of Hvanngilshausar in soft twilight light…

    Hvanngil huts at twilight on the Laugavegur trail

    The next day we trekked across the black sands towards Emstrur, with Stórkonufell as our near constant companion.  I’d by lying if I said this day didn’t drag, but the scenery didn’t change as quickly as previous days.  We didn’t find Emstrur as photographically rewarding as other sections of the hike either, though we take a brief detour to see the Markarfljótsgljúfur Canyon.

    [two_columns]
    [column1]

    Storkonufell from the Laugavegur Trail

    [/column1]
    [column2]

    markarfljótsgljúfur canyon on the Laugavegur trail

    [/column2]
    [/two_columns]

    Landscape and glacier from Emstrur on the Laugavegur Trail

    The final day of the hike saw us reach Thórsmörk by mid-afternoon.  This final stretch saw the landscape change once more from the black desert through to tree lined hillsides.  The weather was suitably moody so we took a trip up Valahnúkur – a peak that gives 360 degree views, looking down multiple valleys with views of glaciers and ice caps.  The rolling clouds and bursts of light only added to the atmosphere.

    Thorsmork on the Laugavegur Trail

    The classic view from Valahnúkur…

    Looking down the valley of Thorsmork from Valahnúkur on the Laugavegur trail

    For our final morning, we decided to head back up Valahnúkur in the hope of a sun rise.  The early start was worth the effort as we were rewarded with brilliant light looking back towards Hattfell, with Einhyriningur the prominent rock in the mid-ground, on the left.

    Einhyrningur and Hattfell from Valahnúkur at Thorsmork

    And the wider view:

    Einhyrningur and Hattfell from Valahnúkur at Thorsmork

    The light never really made it in to the valley of Thórsmörk until it was a little later in the morning, but it got there eventually, lighting up the hillside with the Mýrdalsjökull ice cap behind.

    Mýrdalsjökull from Valahnúkur on the Laugavegur trail

    That was the final image taken before heading back down to the hut to pack up before catching the bus back into Reykjavík.  I think there’s a handful of images amongst those above that I’m really pleased with and, on the whole, I think it’s a reasonable selection to come back with from first trip to such a challenging location (with respect to through-hiking and weather).

    This marks the end of the Laugavegur Trail related posts.  It was an incredible experience that I would recommend anyone do, especially if keen on landscape photography.  I hope these posts prove even vaguely helpful to anyone planning their own trip and if you have any questions about any aspect of the hike, do get in touch via the comments below and I’ll see if I can help.

    Also, do make sure you check out George Wheelhouse’s posts and images from our hike too – between the two of us, we should have most aspects thoroughly covered.

  • Photographing the Laugavegur Trail – The Packing

    Photographing the Laugavegur Trail – The Packing

    In my last post, I wrote about some of the aspects around planning our hike along the Laugavegur trail in Iceland.  This post is continuing that theme (so still no actual photos from the trip yet), but more focussed on what to take and some of the considerations given to photography gear, clothing, food etc.  My main concern ahead of the trip was the total pack weight that I’d have to carry for the hike.  Typically, I’m an ‘over-packer’ who struggles to travel light, but the prospect of a 25kg+ pack was not exciting me, so I worked hard on the balance between comfort and weight.

    My final pack weight was 21.7kg (+2kg of water), and that was without a tent and sleeping matt.  If we’d had to have camped along the way, that pack weight would have gone up to >25kg easily, so I’m glad we booked the huts, as I don’t think I could have reduced it much further.  Everything that went into my pack was put on the kitchen scales, so I’ve tabulated the weights for everything I took later in this post.

    I categorised the items going into my pack to look at how each category contributed to the overall pack weight.  Camera gear makes the biggest contribution to overall weight, just, with food coming in second – two areas I’m not willing to compromise too much on. If photography wasn’t the aim of the trip, a 16kg pack weight would be pretty light, relatively speaking.

    Laguavegur pack weight pie chart

    Below I break down what went into my pack in some detail.  This has the potential to be a bit dry (!) so, if this isn’t your thing, come back in a couple of weeks for a post containing images from the trip.  If obsessing about every gram going into your bag is up your street, get stuck in below…


    Hiking/Sleeping (4.8 kg)

    These are the basics needed to carry the gear, sleep and walk.

    [table]
    [table_row][table_cell_head] Item [/table_cell_head][table_cell_head] Description [/table_cell_head][table_cell_head] Weight (g)[/table_cell_head][table_cell_head] Quantity[/table_cell_head][table_cell_head] Total Weight (g) [/table_cell_head][/table_row]
    [table_row][table_cell_body]Bag[/table_cell_body][table_cell_body]Osprey Aether AG 70 [/table_cell_body][table_cell_body]2155[/table_cell_body][table_cell_body] 1[/table_cell_body][table_cell_body] 2155[/table_cell_body][/table_row]
    [table_row][table_cell_body]Airport Bag[/table_cell_body][table_cell_body] – [/table_cell_body][table_cell_body]188[/table_cell_body][table_cell_body] 1[/table_cell_body][table_cell_body]188[/table_cell_body][/table_row]
    [table_row][table_cell_body]Sleeping Bag[/table_cell_body][table_cell_body]Robens Caucasus 300[/table_cell_body][table_cell_body]980[/table_cell_body][table_cell_body] 1[/table_cell_body][table_cell_body]980[/table_cell_body][/table_row]
    [table_row][table_cell_body]Sleeping bag liner[/table_cell_body][table_cell_body]SeaToSummit Reactor Thermalite[/table_cell_body][table_cell_body]268[/table_cell_body][table_cell_body] 1[/table_cell_body][table_cell_body]268[/table_cell_body][/table_row]
    [table_row][table_cell_body]Pillow[/table_cell_body][table_cell_body]Exped AirPillow UL[/table_cell_body][table_cell_body]60[/table_cell_body][table_cell_body] 1[/table_cell_body][table_cell_body]60[/table_cell_body][/table_row]
    [table_row][table_cell_body]Trekking Poles[/table_cell_body][table_cell_body]Black Diamond Distance FLZ[/table_cell_body][table_cell_body]215[/table_cell_body][table_cell_body] 1[/table_cell_body][table_cell_body]215[/table_cell_body][/table_row]

    [/table]

    Total: 4.8 kg

    – I wouldn’t go for anything smaller than a 65-70 litre bag.  The Osprey Aether, with the ‘anti-gravity’ system, made hauling the load as comfortable as it is likely to be with good support away from the back, comfortable straps and enough pockets/sections for easy organisation and access on-the-fly.  Also, included a rain cover – which is a necessity for the Laugavegur.

    – The airport bag was just a light outer cover to put over the hiking bag as an extra safety measure when checking the bag as hold luggage.

    – I was unsure of the utility of walking poles, for the additional weight, but they’re really good at taking some of the strain away from your knees on ascents/descents, as well as speeding up walking on the flat.


    Camera Gear (5.3 kg)

    [two_columns]
    [column1]

    Laugavegur packing camera gear 1

    [/column1]
    [column2]

    Laugavegur packing camera gear 2

    [/column2]
    [/two_columns]

    A little while ago, I moved from a Nikon D800 to the Sony A7RII system and realised an approx. 50% weight saving on camera/lenses (maybe more on that another time).  This put me in good stead for making my camera gear as light as possible…

    [table]
    [table_row][table_cell_head] Item [/table_cell_head][table_cell_head] Description [/table_cell_head][table_cell_head] Weight (g)[/table_cell_head][table_cell_head] Quantity[/table_cell_head][table_cell_head] Total Weight (g) [/table_cell_head][/table_row]
    [table_row][table_cell_body]Body + Lens[/table_cell_body][table_cell_body]Sony A7RII + 24-105mm f/4 G OSS[/table_cell_body][table_cell_body]1518[/table_cell_body][table_cell_body] 1[/table_cell_body][table_cell_body] 1518[/table_cell_body][/table_row]
    [table_row][table_cell_body]Telephoto lens[/table_cell_body][table_cell_body]Sony 70-200mm f/4 G OSS[/table_cell_body][table_cell_body]1106[/table_cell_body][table_cell_body] 1[/table_cell_body][table_cell_body] 1106[/table_cell_body][/table_row]
    [table_row][table_cell_body]Tripod[/table_cell_body][table_cell_body]TLT Punks Corey + Uniqball[/table_cell_body][table_cell_body]1588[/table_cell_body][table_cell_body] 1[/table_cell_body][table_cell_body]1588[/table_cell_body][/table_row]
    [table_row][table_cell_body]Padded Pouch[/table_cell_body][table_cell_body]F-Stop small ICU[/table_cell_body][table_cell_body]300[/table_cell_body][table_cell_body] 1[/table_cell_body][table_cell_body]300[/table_cell_body][/table_row]
    [table_row][table_cell_body]Rain Cover[/table_cell_body][table_cell_body]Aquatech Small Sports Sheild[/table_cell_body][table_cell_body]150[/table_cell_body][table_cell_body] 1[/table_cell_body][table_cell_body]150[/table_cell_body][/table_row]
    [table_row][table_cell_body]Filter Pouch[/table_cell_body][table_cell_body]Inc. NG grads, polariser[/table_cell_body][table_cell_body]705[/table_cell_body][table_cell_body] 1[/table_cell_body][table_cell_body]705[/table_cell_body][/table_row]
    [table_row][table_cell_body]Accessories Pouch[/table_cell_body][table_cell_body]Inc. 4x batteries, SD cards, swabs[/table_cell_body][table_cell_body]204[/table_cell_body][table_cell_body] 1[/table_cell_body][table_cell_body]204[/table_cell_body][/table_row]
    [table_row][table_cell_body]LEE filter holder[/table_cell_body][table_cell_body]-[/table_cell_body][table_cell_body]72[/table_cell_body][table_cell_body] 1[/table_cell_body][table_cell_body]72[/table_cell_body][/table_row]

    [/table]

    Total: 5.3 kg

    – The weight of the A7RII is inclusive of an L-bracket, the weight of the 70-200mm is inclusive of a lens hood and tripod foot.  The 24-105mm + the 70-200mm gives me decent coverage for landscape work, in two lenses.  I’d umm’d and ahh’d about taking my 28mm and 55mm primes instead of the 24-105mm, but figured that I would end up spending too much time changing between the three lenses in (potentially) grim, wet conditions.  I like the overlap of the 70-105mm range too, as I seem to shoot between 50 and 100mm quite often so, again, minimises lens changes.

    – The weight of my main tripod, with the Uniqball head, is approx. 2.6kg – far too heavy for this kind of trip.  I spent a good while researching “travel” tripods, and the consistent theme seems to be lightweight tripods that are too short and not sturdy.  The Three Legged Thing Punks Corey, whilst still shorter than I’d prefer (without the centre column), is sturdy enough that I was confident it would be worth it’s weight.  I decided to use it in combination with my Uniqball for familiarity and ease of use.

    – All of this could fit neatly into a small F-Stop ICU.  This in turn could fit into a 10ltr dry bag and then into the bottom compartment of the Osprey bag.  A fairly neat system for keeping the camera kit fairly readily accessible but also, importantly, dry.  Organisation, and knowing where everything is, is key when out photographing, so having everything photography related in a single place was ideal.

    – A rain cover is essential for photographing in Iceland, especially with a camera like the A7RII.  This Aquatech cover is perfect for keeping the wet out, whilst not impairing visibility or usability/access.

    – I’m often a big user of graduated filters, so I couldn’t bring myself to leave these at home.  Looking back, I wish I had done as I didn’t really get the use to justify the 700g that the case, the filters and the filter holder weighed.  A polariser is always worth taking, but with the shadow recovery available on the current sensors, or the ability to combine exposures in post-processing, the ND grads could have stayed at home.

    – The accessories pack was neat little way to keep the small bits organised, including 4 batteries, a number of spare SD cards, some sensor swabs and a couple of allen (hex) keys.  The Sony is renown for chewing through batteries, so the 4 here would give me some redundancy whilst charging spent batteries using external power packs (more on that below).

    – Overall, >5kg is a significant weight to add on to any through hiking pack, but I don’t really see how I could have made it any lighter, whilst still being equipped for all conditions.  Taking the filters away would have got it down to around 4.6kg, which I think is a pretty good weight for travel photography with full-frame gear.


    Clothing (3.3 kg)

    This list outlines the pack weight for two full sets of clothes (with me wearing a third (including hiking boots)) and any extra layers including thermals, jackets, hats etc.

    [table]
    [table_row][table_cell_head] Item [/table_cell_head][table_cell_head] Description [/table_cell_head][table_cell_head] Weight (g)[/table_cell_head][table_cell_head] Quantity[/table_cell_head][table_cell_head] Total Weight (g) [/table_cell_head][/table_row]
    [table_row][table_cell_body]Underwear[/table_cell_body][table_cell_body]Merino boxers[/table_cell_body][table_cell_body]70[/table_cell_body][table_cell_body]2[/table_cell_body][table_cell_body]140[/table_cell_body][/table_row]
    [table_row][table_cell_body]Walking Socks[/table_cell_body][table_cell_body]-[/table_cell_body][table_cell_body]65[/table_cell_body][table_cell_body]2[/table_cell_body][table_cell_body]130[/table_cell_body][/table_row]
    [table_row][table_cell_body]Liner Socks[/table_cell_body][table_cell_body]-[/table_cell_body][table_cell_body]35[/table_cell_body][table_cell_body]1[/table_cell_body][table_cell_body]35[/table_cell_body][/table_row]
    [table_row][table_cell_body]Thermal legs[/table_cell_body][table_cell_body]Rab merino+ 120 Pants[/table_cell_body][table_cell_body]130[/table_cell_body][table_cell_body]1[/table_cell_body][table_cell_body] 130[/table_cell_body][/table_row]
    [table_row][table_cell_body]Baselayer[/table_cell_body][table_cell_body]Short-sleeved[/table_cell_body][table_cell_body]133[/table_cell_body][table_cell_body]1[/table_cell_body][table_cell_body]133[/table_cell_body][/table_row]
    [table_row][table_cell_body]Baselayer[/table_cell_body][table_cell_body]Long-sleeved[/table_cell_body][table_cell_body]250[/table_cell_body][table_cell_body]1[/table_cell_body][table_cell_body]250[/table_cell_body][/table_row]
    [table_row][table_cell_body]Shorts[/table_cell_body][table_cell_body]-[/table_cell_body][table_cell_body]190[/table_cell_body][table_cell_body]1[/table_cell_body][table_cell_body]190[/table_cell_body][/table_row]
    [table_row][table_cell_body]Trousers[/table_cell_body][table_cell_body]Trouser/short zip offs[/table_cell_body][table_cell_body]360[/table_cell_body][table_cell_body]1[/table_cell_body][table_cell_body]360[/table_cell_body][/table_row]
    [table_row][table_cell_body]Hoody[/table_cell_body][table_cell_body]-[/table_cell_body][table_cell_body]307[/table_cell_body][table_cell_body]1[/table_cell_body][table_cell_body]307[/table_cell_body][/table_row]
    [table_row][table_cell_body]Down Jacket[/table_cell_body][table_cell_body]With stuff sack[/table_cell_body][table_cell_body]436[/table_cell_body][table_cell_body]1[/table_cell_body][table_cell_body]436[/table_cell_body][/table_row]
    [table_row][table_cell_body]Waterproof Jacket[/table_cell_body][table_cell_body]-[/table_cell_body][table_cell_body]790[/table_cell_body][table_cell_body]1[/table_cell_body][table_cell_body]790[/table_cell_body][/table_row]
    [table_row][table_cell_body]Waterproof Trousers[/table_cell_body][table_cell_body]-[/table_cell_body][table_cell_body]160[/table_cell_body][table_cell_body]1[/table_cell_body][table_cell_body]160[/table_cell_body][/table_row]
    [table_row][table_cell_body]Woolly hat[/table_cell_body][table_cell_body]-[/table_cell_body][table_cell_body]67[/table_cell_body][table_cell_body]1[/table_cell_body][table_cell_body]67[/table_cell_body][/table_row]
    [table_row][table_cell_body]Cap[/table_cell_body][table_cell_body]-[/table_cell_body][table_cell_body]53[/table_cell_body][table_cell_body]1[/table_cell_body][table_cell_body]53[/table_cell_body][/table_row]
    [table_row][table_cell_body]Sunglasses[/table_cell_body][table_cell_body]-[/table_cell_body][table_cell_body]25[/table_cell_body][table_cell_body]1[/table_cell_body][table_cell_body]25[/table_cell_body][/table_row]
    [table_row][table_cell_body]Gloves[/table_cell_body][table_cell_body]-[/table_cell_body][table_cell_body]27[/table_cell_body][table_cell_body]2[/table_cell_body][table_cell_body]54[/table_cell_body][/table_row]
    [table_row][table_cell_body]Buff[/table_cell_body][table_cell_body]-[/table_cell_body][table_cell_body]33[/table_cell_body][table_cell_body]1[/table_cell_body][table_cell_body]33[/table_cell_body][/table_row]

    [/table]

    Total: 3.3 kg

    – All clothes were stored in dry sacks (working on the assumption that the rucksack may get soaked through, even with a rain cover on).

    – I basically had two full changes of clothes for hiking, and one ‘clean’ change of clothes for the downtime in the huts.

    – Layers are the way to go.  I’d often be hiking in just a baselayer and waterproof, but with the ability to quickly put on a hoody and/or a down jacket when we stopped.  That way, you never get too warm or over heat.  Similarly, I only took fairly lightweight trousers, but had the option to combine them with the merino pants if I knew we were going to be standing around when photographing.

    – Merino underwear and baselayers are great for warmth, wicking sweat away and not smelling with repeat use – which is good after a week of hiking with only 3 pairs of boxer shorts!

    – Zippered trouser/shorts are useful for the river crossings.


    Toiletries (0.45 kg)

    Not much to write here but toiletries for the week, including some painkillers, blister plasters, ear plugs (to block out the snoring!) and a small pouch totalled 450g (shown in the bottom left of the picture below, just above the charging pack and cable).


    Miscellaneous (3.2 kg)

    Lauagvegur packing miscellaneous

    Most of the items in the above picture have been covered in the above sections (e.g. the watersproofs, trekking poles, sleeping bag, cap, gloves etc), but the remaining items are covered below, with a few unpictured items at the bottom.

    [table]
    [table_row][table_cell_head] Item [/table_cell_head][table_cell_head] Description [/table_cell_head][table_cell_head] Weight (g)[/table_cell_head][table_cell_head] Quantity[/table_cell_head][table_cell_head] Total Weight (g) [/table_cell_head][/table_row]
    [table_row][table_cell_body]Stove[/table_cell_body][table_cell_body]MSR Windburner[/table_cell_body][table_cell_body]474[/table_cell_body][table_cell_body]1[/table_cell_body][table_cell_body]474[/table_cell_body][/table_row]
    [table_row][table_cell_body]Cup + Spork[/table_cell_body][table_cell_body]-[/table_cell_body][table_cell_body]118[/table_cell_body][table_cell_body]1[/table_cell_body][table_cell_body]118[/table_cell_body][/table_row]
    [table_row][table_cell_body]Camelbak[/table_cell_body][table_cell_body]2ltr (empty)[/table_cell_body][table_cell_body]183[/table_cell_body][table_cell_body]1[/table_cell_body][table_cell_body]183[/table_cell_body][/table_row]
    [table_row][table_cell_body]Anker[/table_cell_body][table_cell_body]External power pack[/table_cell_body][table_cell_body]484[/table_cell_body][table_cell_body]1[/table_cell_body][table_cell_body]484[/table_cell_body][/table_row]
    [table_row][table_cell_body]Anker[/table_cell_body][table_cell_body]External power pack[/table_cell_body][table_cell_body]180[/table_cell_body][table_cell_body]1[/table_cell_body][table_cell_body]180[/table_cell_body][/table_row]
    [table_row][table_cell_body]Charging cables[/table_cell_body][table_cell_body]For phone + camera battery charger[/table_cell_body][table_cell_body]200[/table_cell_body][table_cell_body]1[/table_cell_body][table_cell_body]200[/table_cell_body][/table_row]
    [table_row][table_cell_body]Compass[/table_cell_body][table_cell_body]-[/table_cell_body][table_cell_body]25[/table_cell_body][table_cell_body]1[/table_cell_body][table_cell_body]25[/table_cell_body][/table_row]
    [table_row][table_cell_body]Multitool[/table_cell_body][table_cell_body]-[/table_cell_body][table_cell_body]240[/table_cell_body][table_cell_body]1[/table_cell_body][table_cell_body]240[/table_cell_body][/table_row]
    [table_row][table_cell_body]Headtorch[/table_cell_body][table_cell_body]-[/table_cell_body][table_cell_body]130[/table_cell_body][table_cell_body]1[/table_cell_body][table_cell_body]130[/table_cell_body][/table_row]
    [table_row][table_cell_body]Flint sparker[/table_cell_body][table_cell_body]MSR Strike Igniter[/table_cell_body][table_cell_body]30[/table_cell_body][table_cell_body]1[/table_cell_body][table_cell_body]30[/table_cell_body][/table_row]
    [table_row][table_cell_body]Towel[/table_cell_body][table_cell_body]-[/table_cell_body][table_cell_body]190[/table_cell_body][table_cell_body]1[/table_cell_body][table_cell_body]190[/table_cell_body][/table_row]
    [table_row][table_cell_body]River crossing shoes[/table_cell_body][table_cell_body]Vibram five fingers[/table_cell_body][table_cell_body]135[/table_cell_body][table_cell_body]2[/table_cell_body][table_cell_body]270[/table_cell_body][/table_row]
    [table_row][table_cell_body]5 ltr drybag[/table_cell_body][table_cell_body]-[/table_cell_body][table_cell_body]57[/table_cell_body][table_cell_body]2[/table_cell_body][table_cell_body]114[/table_cell_body][/table_row]
    [table_row][table_cell_body]10 ltr drybag[/table_cell_body][table_cell_body]-[/table_cell_body][table_cell_body]80[/table_cell_body][table_cell_body]2[/table_cell_body][table_cell_body]160[/table_cell_body][/table_row]
    [table_row][table_cell_body]15 ltr drybag[/table_cell_body][table_cell_body]-[/table_cell_body][table_cell_body]94[/table_cell_body][table_cell_body]2[/table_cell_body][table_cell_body]188[/table_cell_body][/table_row]
    [table_row][table_cell_body]Map + Trail book[/table_cell_body][table_cell_body]-[/table_cell_body][table_cell_body]180[/table_cell_body][table_cell_body]1[/table_cell_body][table_cell_body]180[/table_cell_body][/table_row]

    [/table]

    Total: 3.2 kg

    – The stove was not an essential, as we were staying in the huts (which have ample cooking facilities) but I do enjoy the option for a coffee or hot chocolate whilst standing around waiting for light.

    – The Camelbak is great way to carry sufficient water, but fill it up and it’s an extra 2kg heavier!

    – The charging packs were a necessity – I was paranoid about the Sony batteries not lasting, especially in colder weather, so I took enough external charging capbability that I would be able to charge 12 batteries (each of my 4 batteries, 3x over).  The cables and charging set up were heavily influenced by this blog post by David Clapp.

    – Compass, multitool and headtorch just to be on the safe side.  We weren’t expecting any real darkness, or to be lost to the point of needing a compass, but figured better safe than sorry.

    – I wanted something light and quick drying for river crossing shoes, and the Vibram five fingers fit the bill perfectly.  Made good hut shoes too, when dry.


    Food (5.2 kg)

    Food was always going to be an area that introduced significant weight.  A rule of thumb is to allow for 1kg/day for food, but that would be another 7kg, which I couldn’t quite face.  I was also conscious of making sure I ate enough, to have enough energy to enjoy the hike and any photography along the way, so I made sure I had up to 3000kcal per day available in as balanced a diet as possible.

    Laugavegur Packing Food

    Above shows the food I took for the week, laid out such that each column is a ration for a day, with some additional cheese, pitta and Haribo to be eaten each day along the bottom.

    I made use of the Expedition Foods dehydrated meals – they’ve got to be one of the most weight efficient means of carrying food, as each packet in that picture packs around 800kcal for approx 200g.  I had a porridge each morning, then a bolognese or chilli each evening, assuring 1600kcal from those two meals alone.  For lunches, I was eating wholemeal pitta, with tuna and cheese,  And snacks consisted of more cheese, some dried meat (not shown), some dried fruit, trail mix (60g/day), chocolate and some Haribo.  With a hot chocolate sachet per day.

    The total weight of that lot was 5.2kg, so a good saving over the potential 7kg I was initially accounting for.  And, making it even better, because we didn’t start our hike until day 3, I’d already reduced that by nearly 1kg before we had started walking!

    me on the Laugavegur Trail

    Next time…

    So that’s it for the packing.  If you’re still reading this, fair play, well done for sticking with it.  I hope anyone who is planning their own trip of this nature finds that a useful insight into some of the thoughts behind what I took and why.  If you have any comments or thoughts on the above, I’d love to hear them, so please comment below.

    And please do look out for the next post in this ‘Laugavegur series‘ in which I’ll finally be sharing some images from the trip!

  • Photographing the Laugavegur Trail – The Planning

    Photographing the Laugavegur Trail – The Planning

    Over the last couple of years, I’ve been spending more time trying to photograph more rugged places, and so I’ve been making trips to places like Snowdonia, the Lake District or the Peak District in pursuit of landscape photography.  As much as the subject matter, it’s the sense of adventure that can be present in these trips that makes me want to spend my time outdoors in this way and it was these two things that lead to me and fellow photographer, George Wheelhouse, to hike and photograph the Laugavegur trail in Iceland earlier this year.  We’re now nearly 12 months from when we started planning this trip, and I spent an inordinate amount of time researching as much as I could about the hike and the locations along the way, so I thought it would be worth trying to relay some of that information in a couple posts here, before posting the images from the trip.

    The Laugavegur trail (pronunciation) is a very popular through-hiking route in south west Iceland. Depending on where you look, it’s anywhere from 53-55km and is usually hiked across four days (though, people do ultra run it in one, or hike it in two).  The common route is to start at Landmannalaugur, in the highlands, and hike south to Þórsmörk (or Thórsmörk, meaning Thor’s wood) – this has the advantage of being a net descent of around 400m across the hike, though still climbing to above 1000m on the first day.  Once in Thórsmörk, you have the option of extending the hike by following the Fimmvörðuháls trail to Skogar, which is another 22km.

    laugavegur-trail-map A map of the Laugavegur trail, in south west Iceland

    There were quite a few things to consider when planning this trip, so I’ve tried to cover these below:

    Solo or Guided

    There are plenty of organised treks along the trail, even a few run by photographers that are more tailored to photography along the way.  Depending on your level of confidence, these may be a good idea, but they are generally quite expensive.  We were keen to do it by ourselves so we had total control over our schedule and could fix the whole trip around our photography plans.

    When to go

    The Laugavegur trail is only open from June through to September, with late July or early August being optimal with respect to the weather – we chose the first week of August for our trip.

    Itinerary

    I mentioned above that the hike is usually done in four days, but the purpose of our trip was photography, so we wanted to make sure that we gave ourselves enough time to make the most of the landscape around us as well as maximising our odds against the notoriously awful weather along the trail.  Therefore, we decided to give ourselves seven days /six nights to do the hike:

    Day 1 – Bus from Reykjavik to Landmannalaugar
    Day 2 – Landmannalaugar
    Day 3 – Landmannalaugar to Álftavatn (approx. 22-23km)
    Day 4 – Álftavatn to Hvanngil (approx. 5km)
    Day 5 – Hvanngil to Botnar/Emstrur (approx. 11km)
    Day 6 – Botnar/Emstrur to Thórsmörk (approx. 15km)
    Day 7 – Bus from Thórsmörk to Reykjavik

    I hadn’t been to the highlands of Iceland before this trip, and George was fairly keen to spend time at Landmannalaugar again, so we pencilled in two nights there with the intention of doing a couple of day hikes with some photography before we set off on the trail proper.

    Once off on the trail, the first stop is Hrafntinnusker, about 11-12km from Landmannalaugar.  This is up at around 1000m, and is always snow covered.  We decided to skip this as a stop and do two days of walking in one to get to Álftavatn, favouring to spend more time in and around Álftavatn and Hvanngil for photography.  Stopping at both Álftavatn and Hvanngil is a little unusual but this gave us the benefit of an easier stroll between the two sites and therefore plenty of time and energy to explore the areas around both sites, as well as a shorter walk between Hvanngil and Botnar/Emstrur on Day 5.  We also made sure that we had a night in Thórsmörk to give us plenty of time to photograph that area before getting the bus back to civilisation.

    laugavegur-trail-altitude-profile An altitude plot of the Laugavegur trail

    Huts or Camp

    We agonised over this decision for a little while; do we camp or do we book spots in huts along the way?  Camping would give us the most flexibility, with respect to having the freedom to come and go as we please (in early August, sunset was around 10:30pm and sunrise around 4:30am) and being able to change our plans on the fly, but at the cost of around 4kg of additional weight to carry.  Huts would give us warm and dry lodgings each night (and the opportunity to dry clothes!) as well as cooking facilities and that all important 4kg weight saving but at the cost of cash-money (the huts cost 8000 to 9000 ISK per night (around £54-60)), and having a fixed itinerary.

    We decided on booking spots in the huts, favouring the warmth, dryness and reduced pack weight.  This can be done via the Ferðafélag Íslands (FÍ) website.

    Initially, even starting the booking process in Dec 2017, we didn’t get spots for each night (I think due to group bookings for organised tours taking up the space) but were added to the waiting lists for the ‘full’ huts.  We slowly moved up the waiting lists ahead of our trip until about 2 weeks before when we got our last hut spot – success, no need to carry the tents and sleep mats!  Looking back, I’m glad we made this decision. We got incredibly wet on day 2 in Landmannalaugar (even with all of our wet weather gear, it was just relentless) and so it was good to have the space that the huts afford, versus a tent, for drying out.  Though, it has to be said, the huts still aren’t what I would call spacious – the sleeping arrangements are very cosy, often getting 18-20 people into one dorm (with a lot of snoring!).  Also, it’s worth noting that the huts don’t have any additional shower/toilet facilities compared to the camp site; they are all shared between the people in the huts and the campers but are still excellent given the remoteness.

    [two_columns]
    [column1]

    Laugavegur-Hvanngil-Huts The huts and camp site at Hvanngil

    [/column1]
    [column2]

    Laugavegur-landmannalaugar-hut-rooms One of the rooms of the Landmannalaugar hut. Notice the size of the mattresses – nice and cosy!

    [/column2]
    [/two_columns]

    There are a few different hut and camp sites in Thórsmörk, but the one run by FÍ is at Langidalur.  This is an ideal base for the day hikes around Thórsmörk and was the most ‘luxurious’ with respect to the sleeping arrangements of all the huts on the trail (we had single bunk beds in a room 4).

    If you are a confident wild camper, once out of the Fjallabak nature reserve, wild camping could be a good way to explore some of the side hikes, away from the main trail, without being tied to the usual hut camp grounds en route.  We weren’t confident enough to do this, but I think I’d consider it if I were to walk the trail again and could figure out a way to reduce my pack weight further to accommodate the tent and sleeping mat without it becoming overwhelming.

    Buses

    Getting from Reykjavik to Landmannalaugar and back from Thórsmörk is incredibly easy.  There are (WiFi enabled) buses that run from Reykjavik bus station, by Reykjavik Excursions, and the hikers pass (bookable here) will do a single trip to Landmannalaugar and back from Thórsmörk. You do need to book specific journeys, to guarantee a seat, but it really couldn’t be easier to get there and back.

    Other Useful Information

    What to Pack

    This is too big a subject to cover in this post, so I’m going to split that out into a separate post that I’ll publish next.

    Weather/Safety

    The weather, like the rest of Iceland, is likely to be changeable along the trail.  Add in the higher altitudes around Hrafntinnusker, the black sand dessert between Hvanngil and Botnar and the two ice caps over Mýrdalsjökull and Eyjafjallajökull and it has the potential to be pretty grim, to the point of being dangerous – under some conditions, the wardens at each site advise hikers to not proceed until the weather changes.  Fortunately, there are a number of resources to call on:

     – vedur.is – fantastic weather forecasting website, with detailed wind and precipitation forecasts covering the region around the Laugavegur trail.  You’ll want to pay close attention to the wind forecast if camping, but if the wind speeds exceed 16-18m/s, you may want to reconsider your hiking plans full stop.
    – safetravel.is – run by the Icelandic Association for Search and Rescue, this site gives travel advice, including for hiking the trails, based on the current weather and forecasts.  If in doubt, there is a very useful chat function to get the latest information for your needs. They also have an app that allows you to register and then check in every day, as well as raise alerts to your location in an emergency, which may be useful if travelling alone.

    Maps

    Whilst it’s advisable to travel with some form of GPS (more than just your phone, as charging options are virtually zero), a map isn’t a necessity from a navigation perspective.  However, for planning/finding photography locations a map is indispensable.  There are a handful of books and maps focussing on the Laugavegur and surrounding hikes, a few of which are shown below.

    laugavegur-trail-books-and-maps

    The maps in all of these are 1:50000 scale (it always surprises me when you can’t find ‘OS Explorer’ scale maps anywhere else, but they do seem to be a luxury limited to the UK) and are perfect for understanding the landscape around the trail.  The Grunewald book (middle) is the most useful of the three shown, giving detailed descriptions of each portion of Lauagvegur trail as well as some of the other hikes in the area, e.g. day hikes from Landmannalaugar.  It’s a little bulky to pack though, so the Ísland Hiking Map (essentially, just the map pages from that Grunewald book) came in useful for reviewing locations on the fly.  The Zimmer book was another interesting read ahead of time to know what to expect on each day, and what to look out for.

    River Crossings

    This isn’t really ‘planning’, but the river crossings do need some thought before you go.  You’ll likely see them mentioned in every article you read about the trail.  They have the potential to be dangerous, but if you are suitably prepared with some appropriate footwear and some hiking poles and you approach them with some sense, they’re absolutely fine.  Generally:

     – Take a few minutes to locate the best area to cross, hopefully you’ll see other hikers cross just before you and so can gauge whether they chose wisely.  Look for the widest section for the shallowest crossing – narrower may be tempting but it will likely be deeper and so you may get wetter and have a more challenging crossing.
    – Change into a separate pair of shoes and either roll up, or remove, trousers (zip off trousers/shorts are ideal here).
    – Unclip your rucksack, in case of a fall.
    – Cross on a slight diagonal, walking against the current.

    Next up….

    That’s all that I’ll cover in this post.  I hope there are some useful insights into the decisions we made when planning our trip, and some of the resources we called upon ahead of going.

    In the next post, I’m going to cover what to take for the trail, including food, and some of the weight considerations made to account for carrying full-frame photography gear.