Photographing the Laugavegur Trail – The Planning
03 Jan 2019, Posted by in Blog, iceland, landscapes, laugavegur
Over the last couple of years, I’ve been spending more time trying to photograph more rugged places, and so I’ve been making trips to places like Snowdonia, the Lake District or the Peak District in pursuit of landscape photography. As much as the subject matter, it’s the sense of adventure that can be present in these trips that makes me want to spend my time outdoors in this way and it was these two things that lead to me and fellow photographer, George Wheelhouse, to hike and photograph the Laugavegur trail in Iceland earlier this year. We’re now nearly 12 months from when we started planning this trip, and I spent an inordinate amount of time researching as much as I could about the hike and the locations along the way, so I thought it would be worth trying to relay some of that information in a couple posts here, before posting the images from the trip.
The Laugavegur trail (pronunciation) is a very popular through-hiking route in south west Iceland. Depending on where you look, it’s anywhere from 53-55km and is usually hiked across four days (though, people do ultra run it in one, or hike it in two). The common route is to start at Landmannalaugur, in the highlands, and hike south to Þórsmörk (or Thórsmörk, meaning Thor’s wood) – this has the advantage of being a net descent of around 400m across the hike, though still climbing to above 1000m on the first day. Once in Thórsmörk, you have the option of extending the hike by following the Fimmvörðuháls trail to Skogar, which is another 22km.
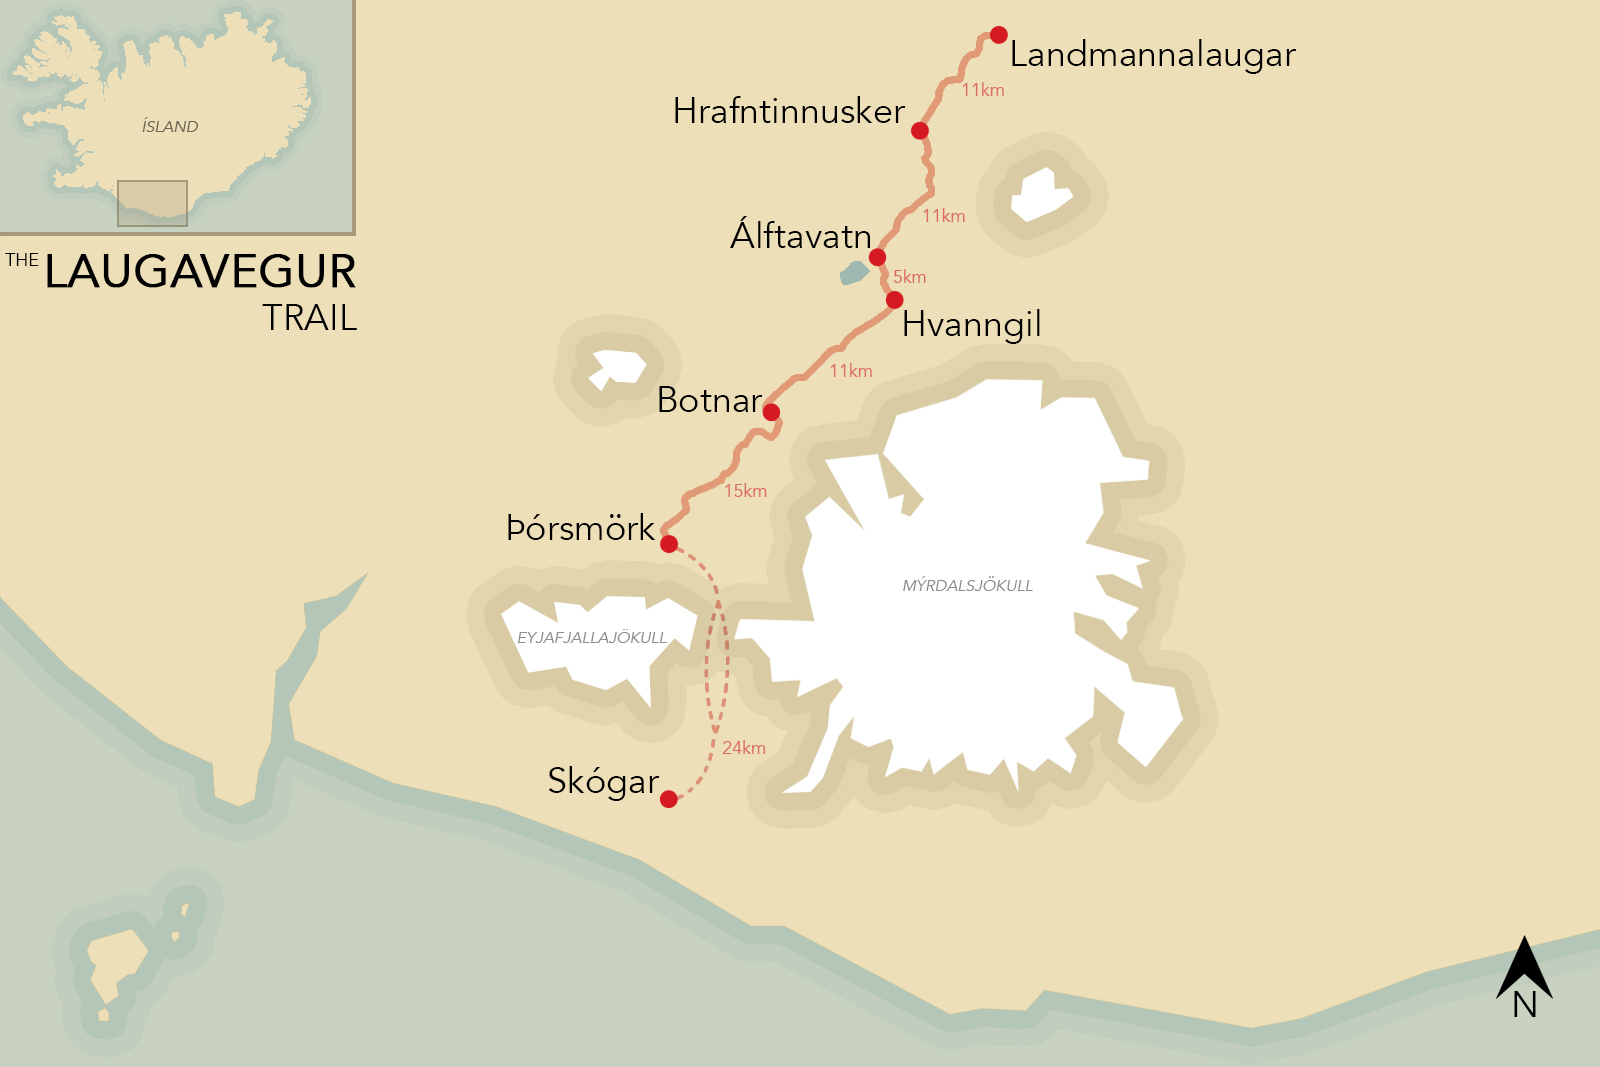 A map of the Laugavegur trail, in south west Iceland
There were quite a few things to consider when planning this trip, so I’ve tried to cover these below:
Solo or Guided
There are plenty of organised treks along the trail, even a few run by photographers that are more tailored to photography along the way. Depending on your level of confidence, these may be a good idea, but they are generally quite expensive. We were keen to do it by ourselves so we had total control over our schedule and could fix the whole trip around our photography plans.
When to go
The Laugavegur trail is only open from June through to September, with late July or early August being optimal with respect to the weather – we chose the first week of August for our trip.
Itinerary
I mentioned above that the hike is usually done in four days, but the purpose of our trip was photography, so we wanted to make sure that we gave ourselves enough time to make the most of the landscape around us as well as maximising our odds against the notoriously awful weather along the trail. Therefore, we decided to give ourselves seven days /six nights to do the hike:
Day 1 – Bus from Reykjavik to Landmannalaugar
Day 2 – Landmannalaugar
Day 3 – Landmannalaugar to Álftavatn (approx. 22-23km)
Day 4 – Álftavatn to Hvanngil (approx. 5km)
Day 5 – Hvanngil to Botnar/Emstrur (approx. 11km)
Day 6 – Botnar/Emstrur to Thórsmörk (approx. 15km)
Day 7 – Bus from Thórsmörk to Reykjavik
I hadn’t been to the highlands of Iceland before this trip, and George was fairly keen to spend time at Landmannalaugar again, so we pencilled in two nights there with the intention of doing a couple of day hikes with some photography before we set off on the trail proper.
Once off on the trail, the first stop is Hrafntinnusker, about 11-12km from Landmannalaugar. This is up at around 1000m, and is always snow covered. We decided to skip this as a stop and do two days of walking in one to get to Álftavatn, favouring to spend more time in and around Álftavatn and Hvanngil for photography. Stopping at both Álftavatn and Hvanngil is a little unusual but this gave us the benefit of an easier stroll between the two sites and therefore plenty of time and energy to explore the areas around both sites, as well as a shorter walk between Hvanngil and Botnar/Emstrur on Day 5. We also made sure that we had a night in Thórsmörk to give us plenty of time to photograph that area before getting the bus back to civilisation.
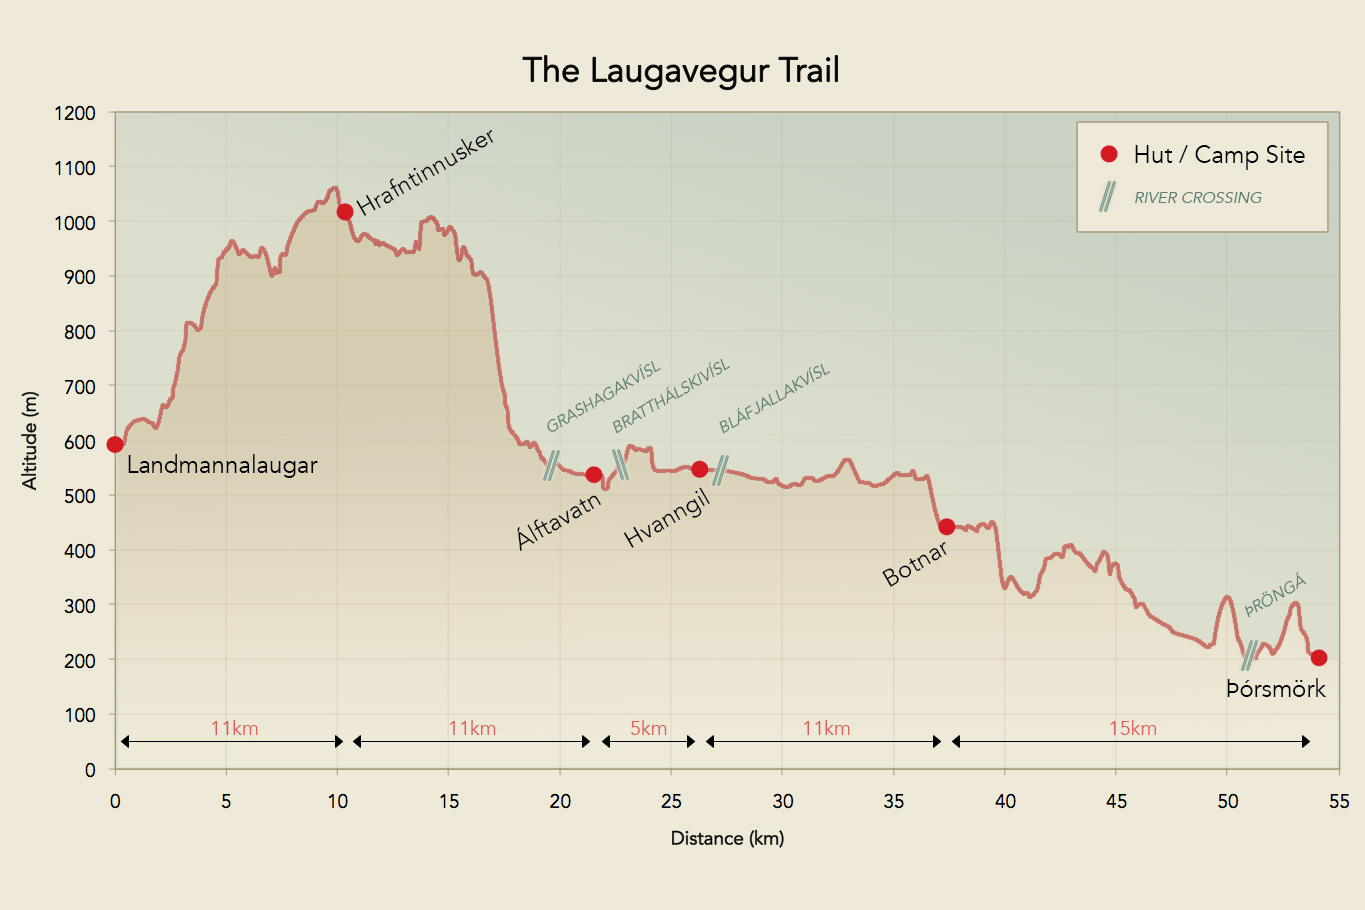 An altitude plot of the Laugavegur trail
Huts or Camp
We agonised over this decision for a little while; do we camp or do we book spots in huts along the way? Camping would give us the most flexibility, with respect to having the freedom to come and go as we please (in early August, sunset was around 10:30pm and sunrise around 4:30am) and being able to change our plans on the fly, but at the cost of around 4kg of additional weight to carry. Huts would give us warm and dry lodgings each night (and the opportunity to dry clothes!) as well as cooking facilities and that all important 4kg weight saving but at the cost of cash-money (the huts cost 8000 to 9000 ISK per night (around £54-60)), and having a fixed itinerary.
We decided on booking spots in the huts, favouring the warmth, dryness and reduced pack weight. This can be done via the Ferðafélag Íslands (FÍ) website.
Initially, even starting the booking process in Dec 2017, we didn’t get spots for each night (I think due to group bookings for organised tours taking up the space) but were added to the waiting lists for the ‘full’ huts. We slowly moved up the waiting lists ahead of our trip until about 2 weeks before when we got our last hut spot – success, no need to carry the tents and sleep mats! Looking back, I’m glad we made this decision. We got incredibly wet on day 2 in Landmannalaugar (even with all of our wet weather gear, it was just relentless) and so it was good to have the space that the huts afford, versus a tent, for drying out. Though, it has to be said, the huts still aren’t what I would call spacious – the sleeping arrangements are very cosy, often getting 18-20 people into one dorm (with a lot of snoring!). Also, it’s worth noting that the huts don’t have any additional shower/toilet facilities compared to the camp site; they are all shared between the people in the huts and the campers but are still excellent given the remoteness.
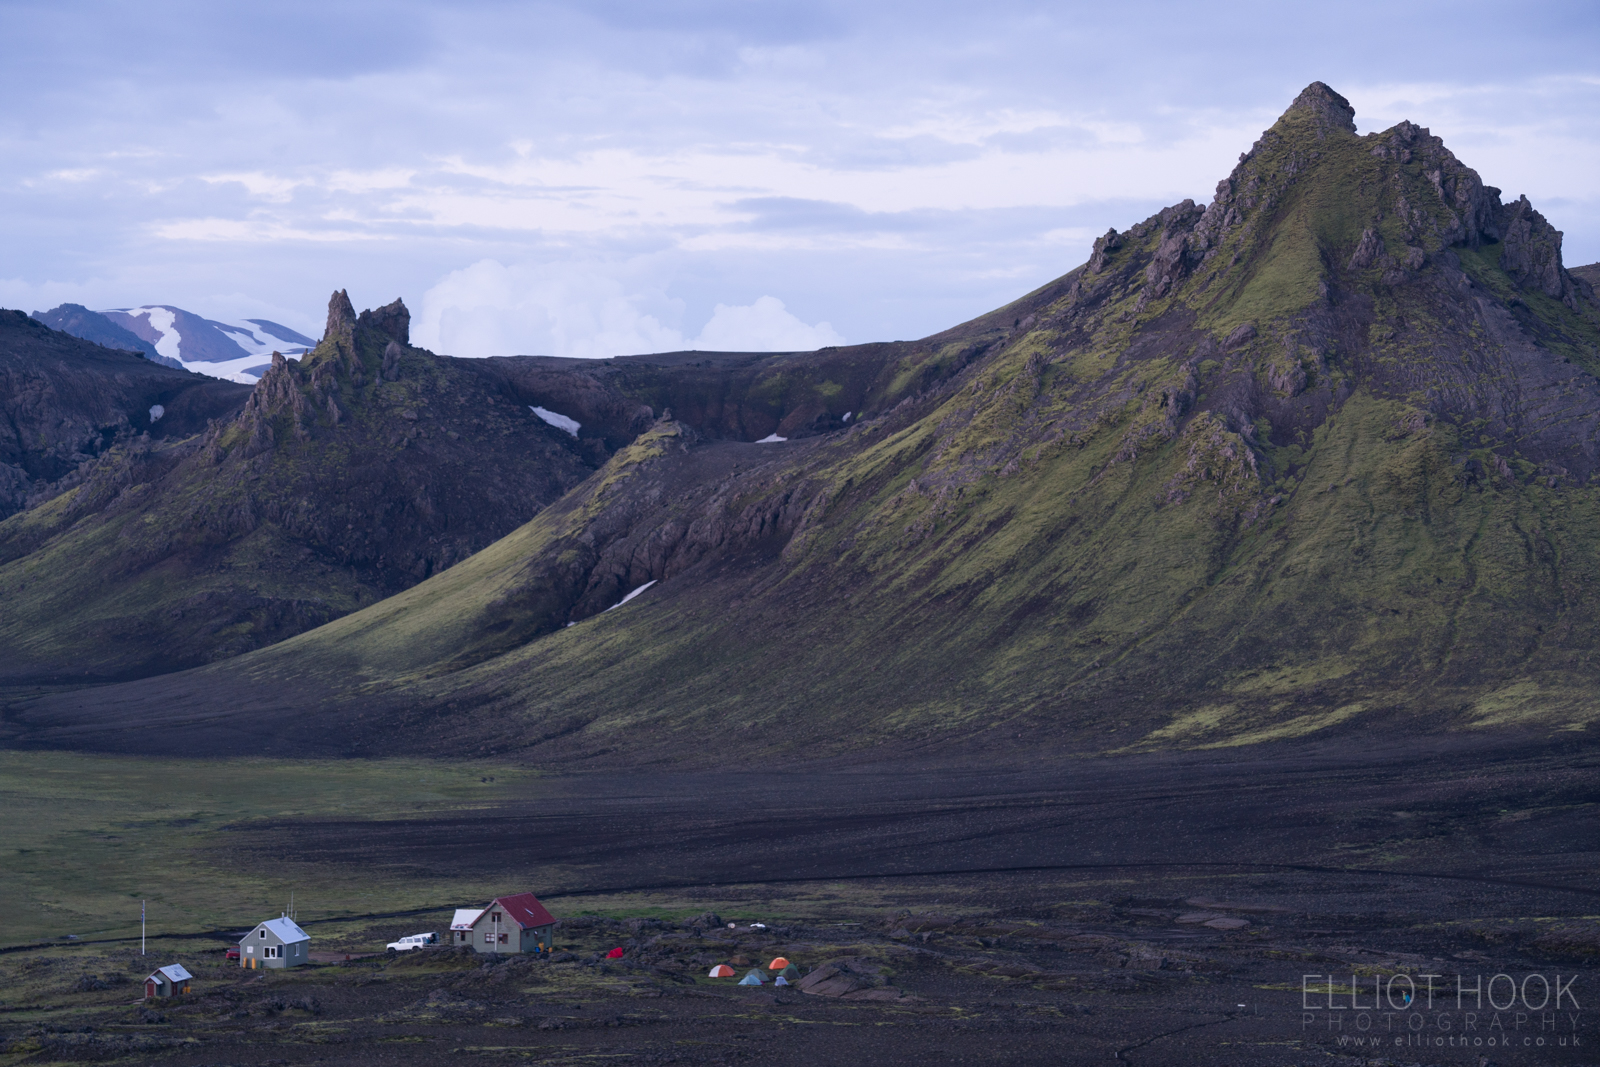 The huts and camp site at Hvanngil
 One of the rooms of the Landmannalaugar hut. Notice the size of the mattresses – nice and cosy!
There are a few different hut and camp sites in Thórsmörk, but the one run by FÍ is at Langidalur. This is an ideal base for the day hikes around Thórsmörk and was the most ‘luxurious’ with respect to the sleeping arrangements of all the huts on the trail (we had single bunk beds in a room 4).
If you are a confident wild camper, once out of the Fjallabak nature reserve, wild camping could be a good way to explore some of the side hikes, away from the main trail, without being tied to the usual hut camp grounds en route. We weren’t confident enough to do this, but I think I’d consider it if I were to walk the trail again and could figure out a way to reduce my pack weight further to accommodate the tent and sleeping mat without it becoming overwhelming.
Buses
Getting from Reykjavik to Landmannalaugar and back from Thórsmörk is incredibly easy. There are (WiFi enabled) buses that run from Reykjavik bus station, by Reykjavik Excursions, and the hikers pass (bookable here) will do a single trip to Landmannalaugar and back from Thórsmörk. You do need to book specific journeys, to guarantee a seat, but it really couldn’t be easier to get there and back.
Other Useful Information
What to Pack
This is too big a subject to cover in this post, so I’m going to split that out into a separate post that I’ll publish next.
Weather/Safety
The weather, like the rest of Iceland, is likely to be changeable along the trail. Add in the higher altitudes around Hrafntinnusker, the black sand dessert between Hvanngil and Botnar and the two ice caps over Mýrdalsjökull and Eyjafjallajökull and it has the potential to be pretty grim, to the point of being dangerous – under some conditions, the wardens at each site advise hikers to not proceed until the weather changes. Fortunately, there are a number of resources to call on:
– vedur.is – fantastic weather forecasting website, with detailed wind and precipitation forecasts covering the region around the Laugavegur trail. You’ll want to pay close attention to the wind forecast if camping, but if the wind speeds exceed 16-18m/s, you may want to reconsider your hiking plans full stop.
– safetravel.is – run by the Icelandic Association for Search and Rescue, this site gives travel advice, including for hiking the trails, based on the current weather and forecasts. If in doubt, there is a very useful chat function to get the latest information for your needs. They also have an app that allows you to register and then check in every day, as well as raise alerts to your location in an emergency, which may be useful if travelling alone.
Maps
Whilst it’s advisable to travel with some form of GPS (more than just your phone, as charging options are virtually zero), a map isn’t a necessity from a navigation perspective. However, for planning/finding photography locations a map is indispensable. There are a handful of books and maps focussing on the Laugavegur and surrounding hikes, a few of which are shown below.
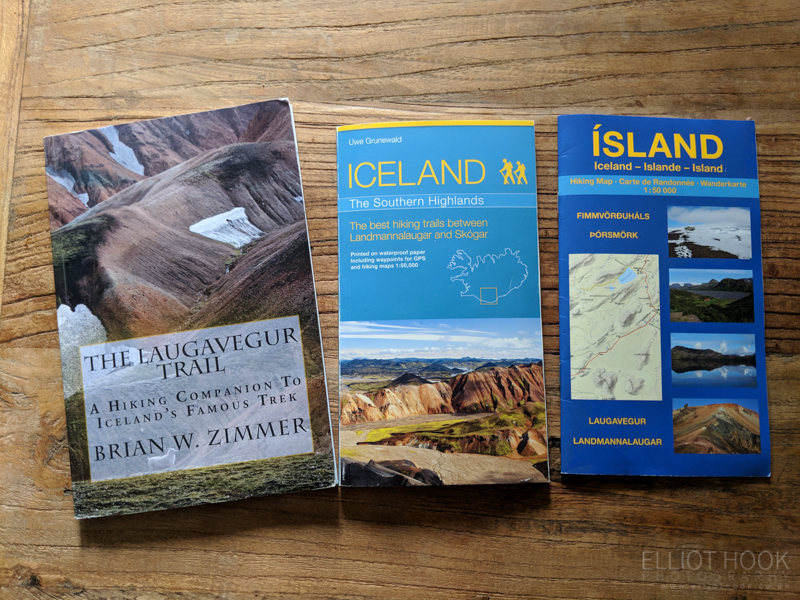
The maps in all of these are 1:50000 scale (it always surprises me when you can’t find ‘OS Explorer’ scale maps anywhere else, but they do seem to be a luxury limited to the UK) and are perfect for understanding the landscape around the trail. The Grunewald book (middle) is the most useful of the three shown, giving detailed descriptions of each portion of Lauagvegur trail as well as some of the other hikes in the area, e.g. day hikes from Landmannalaugar. It’s a little bulky to pack though, so the Ísland Hiking Map (essentially, just the map pages from that Grunewald book) came in useful for reviewing locations on the fly. The Zimmer book was another interesting read ahead of time to know what to expect on each day, and what to look out for.
River Crossings
This isn’t really ‘planning’, but the river crossings do need some thought before you go. You’ll likely see them mentioned in every article you read about the trail. They have the potential to be dangerous, but if you are suitably prepared with some appropriate footwear and some hiking poles and you approach them with some sense, they’re absolutely fine. Generally:
– Take a few minutes to locate the best area to cross, hopefully you’ll see other hikers cross just before you and so can gauge whether they chose wisely. Look for the widest section for the shallowest crossing – narrower may be tempting but it will likely be deeper and so you may get wetter and have a more challenging crossing.
– Change into a separate pair of shoes and either roll up, or remove, trousers (zip off trousers/shorts are ideal here).
– Unclip your rucksack, in case of a fall.
– Cross on a slight diagonal, walking against the current.
Next up….
That’s all that I’ll cover in this post. I hope there are some useful insights into the decisions we made when planning our trip, and some of the resources we called upon ahead of going.
In the next post, I’m going to cover what to take for the trail, including food, and some of the weight considerations made to account for carrying full-frame photography gear.
[…] my last post, I wrote about some of the aspects around planning our hike along the Laugavegur trail in […]
[…] marks the end of the Laugavegur Trail related posts. It was an incredible experience that I would recommend anyone do, especially […]