Photographing the Laugavegur Trail – The Packing
27 Jan 2019, Posted by in Blog, iceland, laugavegur, packing, tripsIn my last post, I wrote about some of the aspects around planning our hike along the Laugavegur trail in Iceland. This post is continuing that theme (so still no actual photos from the trip yet), but more focussed on what to take and some of the considerations given to photography gear, clothing, food etc. My main concern ahead of the trip was the total pack weight that I’d have to carry for the hike. Typically, I’m an ‘over-packer’ who struggles to travel light, but the prospect of a 25kg+ pack was not exciting me, so I worked hard on the balance between comfort and weight.
My final pack weight was 21.7kg (+2kg of water), and that was without a tent and sleeping matt. If we’d had to have camped along the way, that pack weight would have gone up to >25kg easily, so I’m glad we booked the huts, as I don’t think I could have reduced it much further. Everything that went into my pack was put on the kitchen scales, so I’ve tabulated the weights for everything I took later in this post.
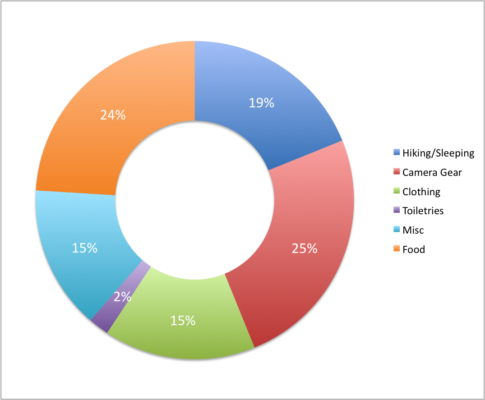
I categorised the items going into my pack to look at how each category contributed to the overall pack weight. Camera gear makes the biggest contribution to overall weight, just, with food coming in second – two areas I’m not willing to compromise too much on. If photography wasn’t the aim of the trip, a 16kg pack weight would be pretty light, relatively speaking.
Below I break down what went into my pack in some detail. This has the potential to be a bit dry (!) so, if this isn’t your thing, come back in a couple of weeks for a post containing images from the trip. If obsessing about every gram going into your bag is up your street, get stuck in below…
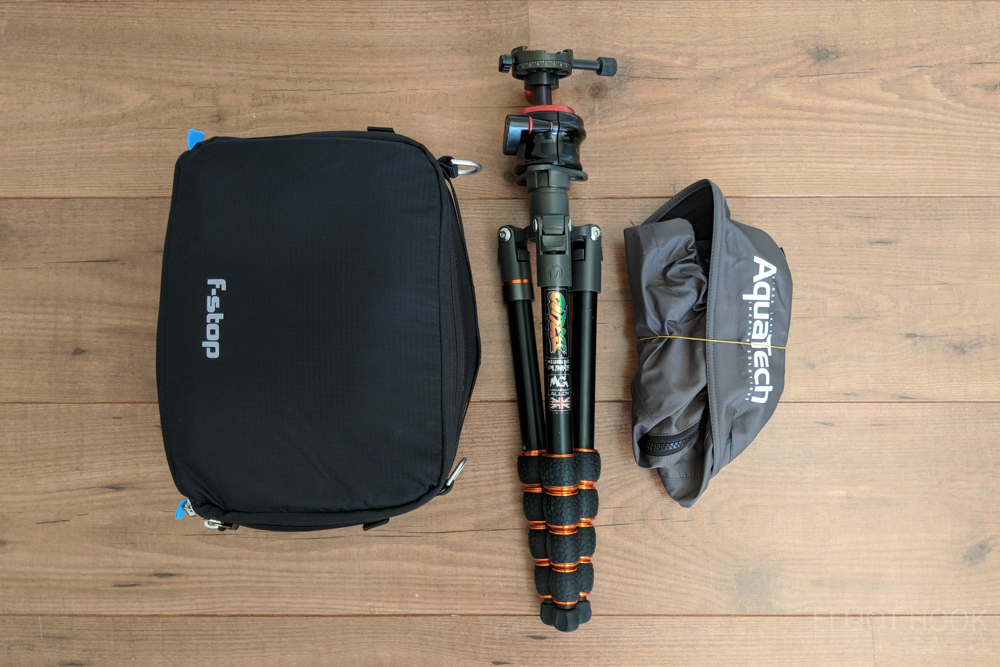
Hiking/Sleeping (4.8 kg)
These are the basics needed to carry the gear, sleep and walk.
Item | Description | Weight (g) | Quantity | Total Weight (g) |
|---|---|---|---|---|
| Bag | Osprey Aether AG 70 | 2155 | 1 | 2155 |
| Airport Bag | – | 188 | 1 | 188 |
| Sleeping Bag | Robens Caucasus 300 | 980 | 1 | 980 |
| Sleeping bag liner | SeaToSummit Reactor Thermalite | 268 | 1 | 268 |
| Pillow | Exped AirPillow UL | 60 | 1 | 60 |
| Trekking Poles | Black Diamond Distance FLZ | 215 | 1 | 215 |
Total: 4.8 kg
– I wouldn’t go for anything smaller than a 65-70 litre bag. The Osprey Aether, with the ‘anti-gravity’ system, made hauling the load as comfortable as it is likely to be with good support away from the back, comfortable straps and enough pockets/sections for easy organisation and access on-the-fly. Also, included a rain cover – which is a necessity for the Laugavegur.
– The airport bag was just a light outer cover to put over the hiking bag as an extra safety measure when checking the bag as hold luggage.
– I was unsure of the utility of walking poles, for the additional weight, but they’re really good at taking some of the strain away from your knees on ascents/descents, as well as speeding up walking on the flat.
Camera Gear (5.3 kg)
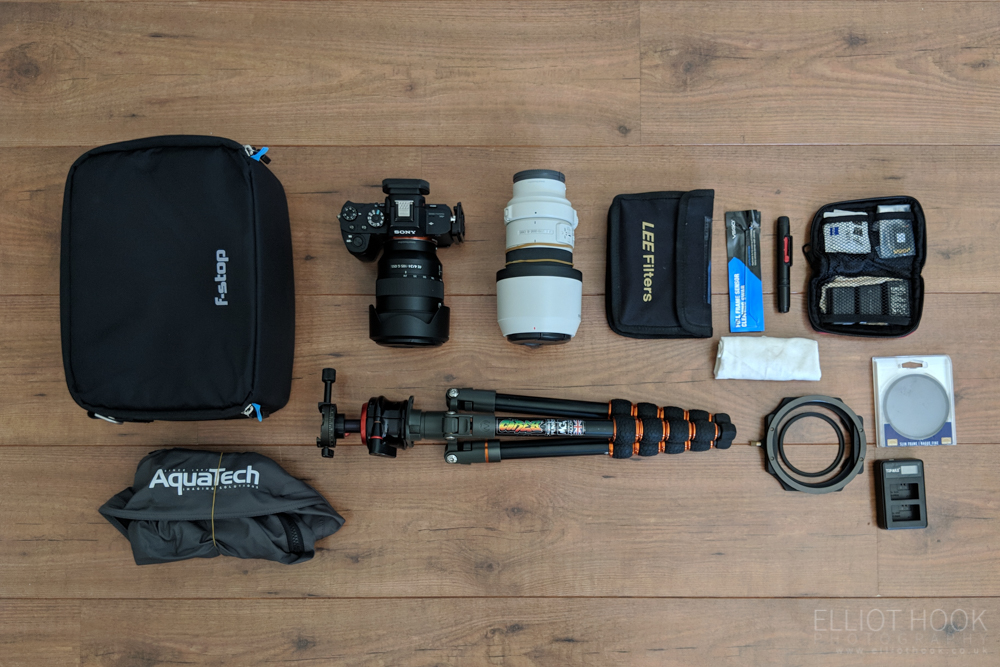
A little while ago, I moved from a Nikon D800 to the Sony A7RII system and realised an approx. 50% weight saving on camera/lenses (maybe more on that another time). This put me in good stead for making my camera gear as light as possible…
Item | Description | Weight (g) | Quantity | Total Weight (g) |
|---|---|---|---|---|
| Body + Lens | Sony A7RII + 24-105mm f/4 G OSS | 1518 | 1 | 1518 |
| Telephoto lens | Sony 70-200mm f/4 G OSS | 1106 | 1 | 1106 |
| Tripod | TLT Punks Corey + Uniqball | 1588 | 1 | 1588 |
| Padded Pouch | F-Stop small ICU | 300 | 1 | 300 |
| Rain Cover | Aquatech Small Sports Sheild | 150 | 1 | 150 |
| Filter Pouch | Inc. NG grads, polariser | 705 | 1 | 705 |
| Accessories Pouch | Inc. 4x batteries, SD cards, swabs | 204 | 1 | 204 |
| LEE filter holder | – | 72 | 1 | 72 |
Total: 5.3 kg
– The weight of the A7RII is inclusive of an L-bracket, the weight of the 70-200mm is inclusive of a lens hood and tripod foot. The 24-105mm + the 70-200mm gives me decent coverage for landscape work, in two lenses. I’d umm’d and ahh’d about taking my 28mm and 55mm primes instead of the 24-105mm, but figured that I would end up spending too much time changing between the three lenses in (potentially) grim, wet conditions. I like the overlap of the 70-105mm range too, as I seem to shoot between 50 and 100mm quite often so, again, minimises lens changes.
– The weight of my main tripod, with the Uniqball head, is approx. 2.6kg – far too heavy for this kind of trip. I spent a good while researching “travel” tripods, and the consistent theme seems to be lightweight tripods that are too short and not sturdy. The Three Legged Thing Punks Corey, whilst still shorter than I’d prefer (without the centre column), is sturdy enough that I was confident it would be worth it’s weight. I decided to use it in combination with my Uniqball for familiarity and ease of use.
– All of this could fit neatly into a small F-Stop ICU. This in turn could fit into a 10ltr dry bag and then into the bottom compartment of the Osprey bag. A fairly neat system for keeping the camera kit fairly readily accessible but also, importantly, dry. Organisation, and knowing where everything is, is key when out photographing, so having everything photography related in a single place was ideal.
– A rain cover is essential for photographing in Iceland, especially with a camera like the A7RII. This Aquatech cover is perfect for keeping the wet out, whilst not impairing visibility or usability/access.
– I’m often a big user of graduated filters, so I couldn’t bring myself to leave these at home. Looking back, I wish I had done as I didn’t really get the use to justify the 700g that the case, the filters and the filter holder weighed. A polariser is always worth taking, but with the shadow recovery available on the current sensors, or the ability to combine exposures in post-processing, the ND grads could have stayed at home.
– The accessories pack was neat little way to keep the small bits organised, including 4 batteries, a number of spare SD cards, some sensor swabs and a couple of allen (hex) keys. The Sony is renown for chewing through batteries, so the 4 here would give me some redundancy whilst charging spent batteries using external power packs (more on that below).
– Overall, >5kg is a significant weight to add on to any through hiking pack, but I don’t really see how I could have made it any lighter, whilst still being equipped for all conditions. Taking the filters away would have got it down to around 4.6kg, which I think is a pretty good weight for travel photography with full-frame gear.
Clothing (3.3 kg)
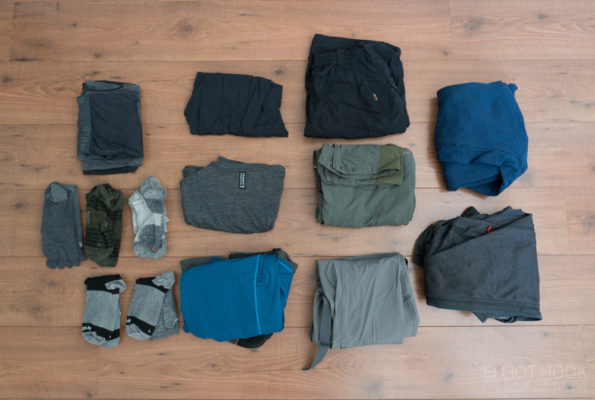
This list outlines the pack weight for two full sets of clothes (with me wearing a third (including hiking boots)) and any extra layers including thermals, jackets, hats etc.
Item | Description | Weight (g) | Quantity | Total Weight (g) |
|---|---|---|---|---|
| Underwear | Merino boxers | 70 | 2 | 140 |
| Walking Socks | – | 65 | 2 | 130 |
| Liner Socks | – | 35 | 1 | 35 |
| Thermal legs | Rab merino+ 120 Pants | 130 | 1 | 130 |
| Baselayer | Short-sleeved | 133 | 1 | 133 |
| Baselayer | Long-sleeved | 250 | 1 | 250 |
| Shorts | – | 190 | 1 | 190 |
| Trousers | Trouser/short zip offs | 360 | 1 | 360 |
| Hoody | – | 307 | 1 | 307 |
| Down Jacket | With stuff sack | 436 | 1 | 436 |
| Waterproof Jacket | – | 790 | 1 | 790 |
| Waterproof Trousers | – | 160 | 1 | 160 |
| Woolly hat | – | 67 | 1 | 67 |
| Cap | – | 53 | 1 | 53 |
| Sunglasses | – | 25 | 1 | 25 |
| Gloves | – | 27 | 2 | 54 |
| Buff | – | 33 | 1 | 33 |
Total: 3.3 kg
– All clothes were stored in dry sacks (working on the assumption that the rucksack may get soaked through, even with a rain cover on).
– I basically had two full changes of clothes for hiking, and one ‘clean’ change of clothes for the downtime in the huts.
– Layers are the way to go. I’d often be hiking in just a baselayer and waterproof, but with the ability to quickly put on a hoody and/or a down jacket when we stopped. That way, you never get too warm or over heat. Similarly, I only took fairly lightweight trousers, but had the option to combine them with the merino pants if I knew we were going to be standing around when photographing.
– Merino underwear and baselayers are great for warmth, wicking sweat away and not smelling with repeat use – which is good after a week of hiking with only 3 pairs of boxer shorts!
– Zippered trouser/shorts are useful for the river crossings.
Toiletries (0.45 kg)
Not much to write here but toiletries for the week, including some painkillers, blister plasters, ear plugs (to block out the snoring!) and a small pouch totalled 450g (shown in the bottom left of the picture below, just above the charging pack and cable).
Miscellaneous (3.2 kg)
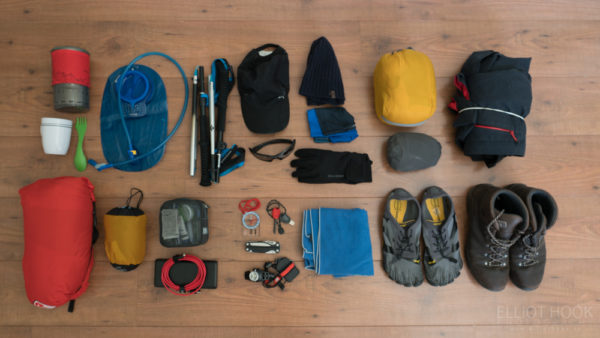
Most of the items in the above picture have been covered in the above sections (e.g. the watersproofs, trekking poles, sleeping bag, cap, gloves etc), but the remaining items are covered below, with a few unpictured items at the bottom.
Item | Description | Weight (g) | Quantity | Total Weight (g) |
|---|---|---|---|---|
| Stove | MSR Windburner | 474 | 1 | 474 |
| Cup + Spork | – | 118 | 1 | 118 |
| Camelbak | 2ltr (empty) | 183 | 1 | 183 |
| Anker | External power pack | 484 | 1 | 484 |
| Anker | External power pack | 180 | 1 | 180 |
| Charging cables | For phone + camera battery charger | 200 | 1 | 200 |
| Compass | – | 25 | 1 | 25 |
| Multitool | – | 240 | 1 | 240 |
| Headtorch | – | 130 | 1 | 130 |
| Flint sparker | MSR Strike Igniter | 30 | 1 | 30 |
| Towel | – | 190 | 1 | 190 |
| River crossing shoes | Vibram five fingers | 135 | 2 | 270 |
| 5 ltr drybag | – | 57 | 2 | 114 |
| 10 ltr drybag | – | 80 | 2 | 160 |
| 15 ltr drybag | – | 94 | 2 | 188 |
| Map + Trail book | – | 180 | 1 | 180 |
Total: 3.2 kg
– The stove was not an essential, as we were staying in the huts (which have ample cooking facilities) but I do enjoy the option for a coffee or hot chocolate whilst standing around waiting for light.
– The Camelbak is great way to carry sufficient water, but fill it up and it’s an extra 2kg heavier!
– The charging packs were a necessity – I was paranoid about the Sony batteries not lasting, especially in colder weather, so I took enough external charging capbability that I would be able to charge 12 batteries (each of my 4 batteries, 3x over). The cables and charging set up were heavily influenced by this blog post by David Clapp.
– Compass, multitool and headtorch just to be on the safe side. We weren’t expecting any real darkness, or to be lost to the point of needing a compass, but figured better safe than sorry.
– I wanted something light and quick drying for river crossing shoes, and the Vibram five fingers fit the bill perfectly. Made good hut shoes too, when dry.
Food (5.2 kg)
Food was always going to be an area that introduced significant weight. A rule of thumb is to allow for 1kg/day for food, but that would be another 7kg, which I couldn’t quite face. I was also conscious of making sure I ate enough, to have enough energy to enjoy the hike and any photography along the way, so I made sure I had up to 3000kcal per day available in as balanced a diet as possible.
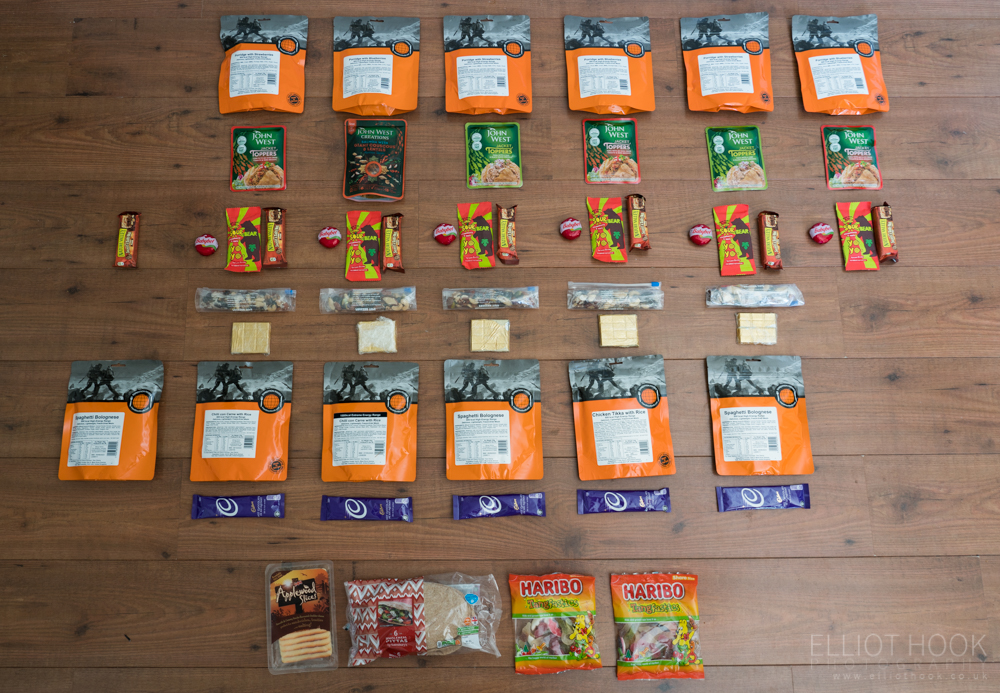
Above shows the food I took for the week, laid out such that each column is a ration for a day, with some additional cheese, pitta and Haribo to be eaten each day along the bottom.
I made use of the Expedition Foods dehydrated meals – they’ve got to be one of the most weight efficient means of carrying food, as each packet in that picture packs around 800kcal for approx 200g. I had a porridge each morning, then a bolognese or chilli each evening, assuring 1600kcal from those two meals alone. For lunches, I was eating wholemeal pitta, with tuna and cheese, And snacks consisted of more cheese, some dried meat (not shown), some dried fruit, trail mix (60g/day), chocolate and some Haribo. With a hot chocolate sachet per day.
The total weight of that lot was 5.2kg, so a good saving over the potential 7kg I was initially accounting for. And, making it even better, because we didn’t start our hike until day 3, I’d already reduced that by nearly 1kg before we had started walking!
Next time…
So that’s it for the packing. If you’re still reading this, fair play, well done for sticking with it. I hope anyone who is planning their own trip of this nature finds that a useful insight into some of the thoughts behind what I took and why. If you have any comments or thoughts on the above, I’d love to hear them, so please comment below.
And please do look out for the next post in this ‘Laugavegur series‘ in which I’ll finally be sharing some images from the trip!
[…] the next post, I’m going to cover what to take for the trail, including food, and some of the weight […]
A really useful insight, thanks!
[…] on from my previous two posts on hiking the Laugavegur trail last year, this post contains my favourite images from that trip. […]
Thanks Elliot. Very helpful and gernerous of you to share.